
I promised a tutorial for my accidentally discovered method of making soles for doll shoes, and here it is! Three shoes made like this have been around for quite a while now; they have been put on and off many times, dropped and even stepped on lightly (I can be a real klutz >.<) and I'm happy to say they survived without noticeable warping or other damage. Now I can share the tutorial with confidence. There are over 40 photos next - click on if you can handle...
The whole spider sandal adventure started with an innocent idea for a shoe design and a mislabeled Pinterest pin stating I have a tutorial when I didn't. It came together so perfectly at the right time - the motivation, the design! Let's look a few posts back where I was so psyched about making these in a breeze:
I had to think of a design that involves the least amount of leather to make some quick shoes for the sole tutorial.Boy, if I had known how wrong I was.
These shoes were neither quick, nor easy, and the "no leather" thing proved to be more fussy than if I had just used a plain old leather pattern like a normal person. This is why I'll have a chapter dedicated to the upper part; if anyone decides to replicate this particular design I did, I wouldn't wish my worst enemy having to figure it out on their own.
Alright, let's begin!
- insole
- upper part (the one you see as "the shoe")
- outsole
- in case of my Monster High and other dolls with arched feet, a heel
Disclaimer: I can't stress enough that this is one of many possible methods, which I tried and it happened to work. For proper shoe tutorials from someone with experience, browse Tarja's blog or watch Froggy Mama's video for easier strappy shoes made entirely from paper that work just as well.
I recommend completing a step for both feet before moving to the next one. You'll be guaranteed to have the same type of cardboard and shade of paint for both shoes and you can check the symmetry at any stage, which is not as easy if you try to match an already completed shoe.
Materials for the sole:
- some legs you want to make shoes for
- cardboard (since I don't know the difference between cardboard and card stock, I'll say cardboard when I refer to the thing small boxes are made of - such as from cereal, perfume or the doll itself)
- office or notebook paper
- scissors
- pencil
- white glue (carpenter's glue, PVA) *pictured later
- something to apply the glue with, toothpicks work great
- a stick for the heel, mine was a bamboo skewer *pictured later
Optional but useful:
- cling wrap to protect the legs
- masking tape for light, temporary hold
- small elastic ties for when you run out of free hands

Shaping the sole
Start by holding a piece of paper against the doll's foot and tracing the shape. I filled in a bit at the toes to make a rounder tip. To save the pattern for later use, I label it and cover on both sides with scotch tape, then cut it out - it's my personal preference.
Check the fit. Use the pattern to trace two insoles on cardboard, one for each foot. To make outsoles, add a bit of length at the heel and toes. If you don't mind the Doc Martens look, you can make the outsole altogether larger; I didn't.
 |
| Left to right: previous shoes pattern, modified insole pattern, outsole pattern with extra bits at the ends |
Since my first attempt, years ago, I learnt that shoes are easier to work with if the two parts of sole between which the upper part goes are formed beforehand and hold their shape. I used to glue the upper part under the insole and add layers until everything was covered or I lost patience. This is not how it works.
The insole (or outsole) is stiffened simply by gluing it to a piece of paper and letting it dry into the correct shape.
Spread white glue on the cardboard sole...

...press it into a piece of paper...

...cut the excess, form it on the doll's foot...
 |
| This only takes a few seconds but I replaced my hand with an elastic tie to snap a clean picture |
... after which you can take it off the foot and bend some more to make sure it bent enough:

Meanwhile, make the upper part however your heart wishes.
How I made the spider
I was bent on making shoes that look like a spider spread over the foot and nothing could change my mind. After a couple of failed attempts...

... I did the sensible thing and bought a suitable material for the spider legs.

This is very thin soft cord, like shoelaces, but on a much smaller scale. It's not stiff like the kind used for necklaces. I needed about a metre which included a few unsuccessful experiments. Here are all the materials for the spider:
- thin cord
- sewing thread
- leather or paper scrap
- rhinestones in coordinating sizes for the cephalothorax and abdomen of the spider (a spider has 2 body segments). If you wish to make an insect, use 3 rhinestones for the body and only 3 pairs of legs.
- rubbery glue or leather glue (glue that dries flexible and squishy)
- gel superglue or other glue that dries very quickly
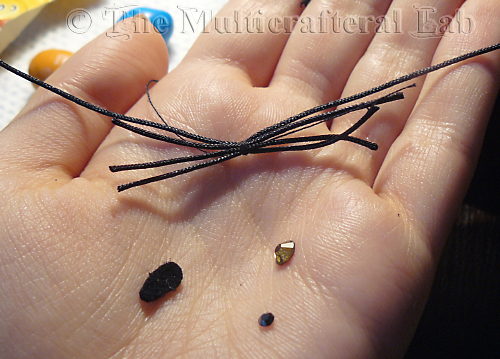 |
| Four pieces of cord tied with thread in the middle, a small leather egg shape, 2 rhinestones in different sizes I forgot; the big one is garnet and the small one is gunmetal. |
Three of the cord pieces are 5-6cm (2") and the last one is 11ish cm (4 1/2"). Looking back, I think the last pair of legs (that go behind the ankle) should have been made from matching elastic - I trashed two uppers because the tension was wrong beyond repair.
After tying the legs, I spread them on a flat surface to make sure they weren't scrambled, put a tiny drop of rubbery glue in the middle of the leather piece, with the long legs towards the blunt end and pressed well to secure and flatten the knot. I used leather because it's soft and gives in to accommodate the knot bulge, but heavy paper should work just as fine. The spider is done.
I used masking tape to tape the insole to the foot and some more to center the spider in the right place. I could hold it just as well with a finger if I didn't want to take pictures with a free hand. I chose to have the spider head for the toes.

All that's left is to glue the cord under the sole in the shape of a spider - 2 pairs of legs go towards the front, the next towards the heel and the last one goes all the way behind the ankle. I tried to use white glue which worked great for leather, but the cord kept going back to its position before I could hold it enough to stick. If you can manage to do this with white glue, more power to you! I had to bring in my trusted ally - the gel superglue.
There are no pictures for the next step, because the glue dries instantly and I was already short on free fingers. I'll do my best to explain.
First, I tied the knot behind the ankle, but didn't glue it yet (actually, I did, and I had to throw it away). So don't glue - it's just a guide.
Start with the two pairs of legs in the middle. Put a small dot of glue under the sole where you think the leg should go. Grab the very tip of the cord, gently tug and bring it over the glue dot; make sure it's in the right spot and not twisted, and press into the glue. Hold for a couple of seconds and let go. Try to flatten the glued cord while it's still somewhat pliable by applying short pressure with the side of a stick (or your nails, if you don't care).
Glue the opposite leg in the same pair before moving to the next pair. (We are talking spider legs here)
Glue the front legs, but don't tug too much, let them curve.
Finally, check the tension of the ankle knot and secure it with glue. It has to be tight enough to hold on the foot, but loose enough to allow taking it off.
This is what it looks like:

I had different ideas for that heel part, but none of them worked so I let it be a simple knot with the excess trimmed. It was bulky, so I hid it inside a ribbon piece: glued one end of 5mm satin ribbon under the heel, looped it over the knot, glued under the heel again, trimmed, and sewed a couple of stitches to keep the knot in place. Here is the shoe again, no foot:
 |
| I was sick at home celebrating Independence Day (August 27) with an m&m flag (yay for Russians finally making blue m&m's!) |
Back to the sole - assembly
This is the bottom of the sole after trimming the excess cord. IT's worse than it looks:
 |
| Notice how the front legs crossed under the sole to help the curved shape |
Level the sole with scrap leather, cord, or anything. This time you can use white glue and relax:

Check the fit of the outsole and glue in place. The cord/superglue combo makes for a thick sole sandwich, which requires more work over the next steps. But no worries! If this is doable, thinner soles are a breeze to make.
Now cut a manageable piece of paper bigger than the sole, spread white glue under the sole and press together. You can use office paper or thinner note paper for smaller wrinkles (you'll see).

Trim the paper following the outline of the sole, but with a leftover as wide as the thickness of the sole. The idea is to wrap the sole sandwich in paper, which will provide a smooth, workable surface for the paint to adhere.

When it's dry, fold the edges upwards to cover the sole. Try to keep even wrinkles around curves. Trim down any ugly edges. Cut notches where the upper part attaches, if necessary. Apply a small amount of white glue and smooth the paper over the side of the sole. Keep a moist towel (or finger) to wipe any fresh glue that leaks over the upper shoe.

For a thin sole, this is enough. Check that both soles have the same thickness and add more layers of paper to even out differences. Wait for the glue to dry completely and sand any rough edges.
In my case, I added more paper strips to the sides and trimmed the excess. Here is an idea of what I did:

The heel
I made the main part of a heel from a bamboo stick. Measured previously, the MH requires a 19mm (3/4") heel. Looking at the foot, it seems like too much, but trust me, it's just the right size with very little spare for sanding.
 |
| This is because if you place the toes parallel to the ground, the doll will lean backwards and won't be able to stand. The toes have to be tilted in the shoe. |
Cut two equal heels at an angle and glue them a little away from the edge:


Check that the heels are vertical and both shoes match. Apply a generous amount of glue at the base and let them dry. Check from time to time, sometimes the glue warps the sole, causing the heel to stand at a funny angle.

Let it dry thoroughly before the next step. It will put some pressure on the heel, so it must be anchored firmly.
Cut some paper strips of various width, much narrower than the height of the heel:

The strips will go around the heel, connecting the perimeter of the sole to the heel. If they wrap around the heel at the same height, the outer strip will be wider and the inside narrower. Find a width you like to go behind the heel. This is one of those easy things that are difficult to explain, so just look at the next pictures.
Put some glue on the sole around the heel and on the part of the heel stick where the strip will end:
 |
| I used more than necessary to make it visible in the picture |
Wrap the strip around the sole heel, angle it so it touches the stick heel:

This would be an easy way to make wedges, too - just ignore the next steps, glue more strips to cover all the empty space, repeat once or twice, trace the bottom outline on cardboard, cut it out, glue to the tip and heel, shove more glue into the cracks and paint!
Because I prefer a separate heel, I'll show instead how to wrap it all around.
Make a cut into the strip to about the point where you want the heel base to end:

Do it on both sides. Gently fold the flaps inside, in front of the heel.
Find a strip of suitable width to cover the inside of the heel. Ideally, they should meet at the same height of the heel stick. Apply some glue to the outside of the flaps and place your new strip on top:

Make sure there is no crack where it meets the sole. Tear the ends short (for a smoother finish) and glue them over the previous strip.

Repeat for a second layer. You may want to use a thinner paper for a neater result (mine is rough because I forgot). You can reverse the order of the strips now. Here is another look at the strip that goes on the inside, before it's glued:

Check if the tugging and the moisture didn't pull the heel in a different direction. The doll below is standing unaided, so it's all good:
 |
| By this time, insomnia kicked in and I drafted this leather skirt while waiting for all the glue to dry |
I like to cover the whole heel with glue. When it dries, it will take its final shape, making it easier for me to fill in any depressions or sand bumps.

I let it dry overnight, filed all the places on the sole that needed it and spread a final layer of glue to tame the paper fluff I disturbed. I say "filed", because I have no idea where my sandpaper is hidden. Nail file FTW!
 |
| You can see I filed through the text in a previous layer |
At this point I decided the ribbon was too square and ugly so I framed it with a piece of chain:
 |
| Minor detail, it was a pain to align with shaky hands and I don't recommend it; just so you know where it came from in the next pictures |
Finishing touches
Start with the shoe sanded smooth and completely dry. You can paint the paper/glue construction in the same way as papier-mâché: with acrylic paint, gouache, poster paint or tempera. I used acrylics.
I decided to paint both the inside and the outside with an anthracite colour and a light spider web design. I can't believe I forgot to take a picture of my brushes (they were a few different sizes from various brands, a flat #2 and a few rounds up to #0), but here are my paints:
 |
| Black, silver, pearl, white |
I mixed black and silver with a hint of white for the base:
 |
| A couple of layers should do |
I mixed pearl and white for the web:

I continued all around the edge, then covered with a thin wash of the grey to fade the edges. The addition of a pattern made the bumps less noticeable.
I wanted a super glossy look, so I covered the whole outer sole with two thick coats of nail top coat. I would suggest using as little water as possible with the paint and if varnish is desired, use a non water-based one. All the moisture may warp the sole when it's almost finished and harder to go back and fix.
This is all for the sole tutorial!
Now back to the spider...
I trimmed even the leather bits and cut a V slice from the front:
 |
| +++ scary and anatomically accurate |
For the cherry on the cake, I put dots of gel superglue on the spider body, picked up my rhinestones with a wet Q-tip, and placed them on top. The knot provided a good support for a slouching spider and that's it! The shoes are complete!
 |
| Man, macro photos of minis are embarrassing... |
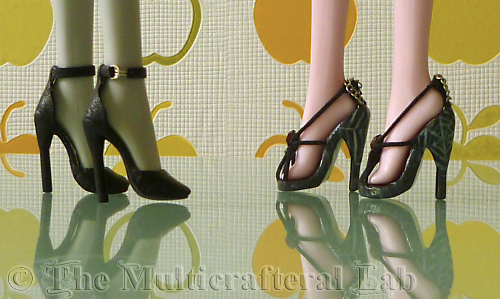
Check out all the angles:
Front

Back

Side

The black shoes have the same type of sole, but it's much thinner
In the picture above you can see what I was talking about when I said the toes must sit at an angle for the doll to stand. If the shape of the sole bothers you, level that part of the foot with foam, a wedge or something, wrap with cling wrap and form the soles on the modified leg.
The dolls can stand on their own if the heel height is correct. No stands were used anywhere in these pictures.

Without the doll:

Finally, a closeup of the spider:

I'd like to hear your thoughts on this project. Did you like the sole tutorial?
Will you be attempting the spider?
~(^^) The Black Kitty
Thanks for the tutorial. I love the spider shoes and want to try these at some point.
ReplyDeleteI'm glad you like it and I wish you luck!
DeleteWow! Those shoes are gore-geous!
ReplyDeleteI'll have to give the shoe-making a go sometime; maybe not the spider, but something for Nefera. Poor girl could really do with some new shoes.
Thank you so much for the compliment! Indeed, Nefera has a poor wardrobe - this is good motivation to make something new though!
DeleteOoh... Great project and amazing tutorial! Thanks for all the work you put into this...I'll definitely be incorporating some of these techniques into my abjd shoe making adventures! So far I've only made flats, but I've got a gal who only wants heels.
ReplyDeleteGlad it inspires you! I didn't get around to making flat shoes yet (weird, right?), but I think heels are more challenging. Some people have used a tight roll of leather or fun beads for the heel. I'm sure you'll make some fine shoes, judging by the other projects on your blog :)
DeleteHey, those are amazing. I read through the tut twice and still think you have crazy patience.
ReplyDeleteMystic.
Crazy patience? You can go ahead and say I'm totally nuts! Thanks, Mystic (^^)~
DeleteThis is fantastic! You have the patience of a saint, but it's paid off - those shoes look as good as anything from a shop.
ReplyDeleteThanks! I already thought of two improvements though =)
DeleteBlack Kitty, I found you quite by accident. Bravo on a REALLY impressive pair of shoes. I have tried many, many times to make a pair (using oven bake clay for the shoe heels/soles. My real problem is with the uppers. I have nearly given up. But before I do, I will try your tutorial. Thank you for the share.
ReplyDeleteThank you! I worship the doll fashion you create so a compliment from you means a lot to me! I'm surprised that given your talent you find doll shoes intimidating. You made some fantastic spats. The next step now is to make them a little longer, cut notches in the bottom edge, glue under a cardboard insole and glue that to the clay outsole to make boots. Or try to make a simple strappy style from ribbons. I recommend Froggy's video tutorial linked in the beginning of this post. Her way is the easiest! I'm glad my tutorial gives you confidence to try again and I hope to see footwear on your blog really soon. Good luck!
DeleteThese are AMAZING. I don't think I would ever have the patience to create these; however, I love, love, love the other pair, as well. The addition of the gems on the spider is ingenious! Great Job!!!
ReplyDeleteI'm glad you like them! The other pair is easier, sorry I scared everyone by writing the tutorial around the most difficult project ^^"
Deletethank you so much for posting this tutorial I was lost I have been trying to make heeled soles for my dolls for months now this just took away the frustration from something that would normally be fun and exciting for me thank you
ReplyDeleteI'm glad to help! Don't forget to check out My Froggy Stuff's video that I linked, her way is even simpler because the heel is just rolled paper. Good luck!
DeleteOh, what can I say about this? It's just WoW in so many ways! I super love the shoes (I know I saw the other one b4 - fab too btw! - but this one I think I missed), the spider is adorable, the gems are a glorious idea, the patience to go through all those steps to make them is admirable! And last but not least! The patience to take pics of ALL steps and then to write this awesome tutorial just for us is wicked cool! Thanks a lot for that! ^_^ I sure wanna try it too. First I'll practice a bit more with the easier projects, but I see myself being brave enough to try this in a near future. :D
ReplyDeleteI thought you'd seen this before! Well, it's never late to share knowledge and receive compliments ^^. It actually took more time to take the pictures - it always does - than if I'd went ahead without thinking what I need to photograph, like the other pair where I was trying things out.
DeleteI'll be awfully proud of you if you decide to make the spiders. I am already proud of your results you showed us recently, but I know you can move to something more difficult soon ;)
thats perfect, you rock
ReplyDeleteso disappointed that my froggy stuff probably stole your tutorial without giving credit probably, she never does
Oh no, she didn't steal it! She uses different types of glues, her heels are paper cones and her uppers are paper strips, too. It seems similar because there are only so many ways to make doll shoes out of stuff lying around the house :) Glad you liked my tutorial, Anonymous!
DeleteBellissime, Sarà possibile fare la stessa cosa per barbie?
ReplyDeleteGrazie! I'm sure it's possible with thinner thread and smaller rhinestones. It's on my to-do list :) If you mean just the soles, they definitely work for Barbie, I already tried.
DeleteThese are awesome! So detailed :) So far my only attempt at shoe making is boots - I made wedge soles out of Fimo and cured those first, then used stretch pleather to draw around the doll's legs to make a two-piece boot shape. The segment covering the wedge I made sure was narrower than the sole so it would really grip and cling when glued. I got lucky first time I think - the progress pic is here - https://instagram.com/p/59kAHJCb4l/?taken-by=lisascullard You can see a doll standing unaided in them by clicking left to the next picture. I really want to try making heels for these kind of feet, I may try using Sugru over wooden picks or skewers, or Fimo, which is a bit cheaper, to do it - your paper ones are inspiring though. I think you must get more control over your detailing that way - my fingers get sticky using polymer or silicon clay and they are often very fingerprinted :D
ReplyDeleteThe boots look great so far and I really dig the two leftmost dolls on your collective picture! You can definitely give paper heels a try, paper is cheap and easy to come by :) You can also improve the look of uneven heels from whatever materials by covering them in rhinestones, caviar beads or just wrapping leather or fabric around them!
DeleteDo you accept commissions? I wouldn't mind buying some spider shoes from you.
ReplyDeleteNo, but I have a distant idea to open an Etsy shop or something like that and it's always good to know what kind of things are requested :) Thanks for stopping by!
Deletehello everyone! im a 6th grader who has 5 barbie dolls. i love your spider shoes (and the black ones.)
ReplyDeleteThank you! Have fun with your collection (^^)~
Deletewhy don't you add My Froggy Stuff to your list of favorite blogs? It is an awesome blog !
ReplyDeleteI do follow her on Youtube and I keep forgetting she has a text blog as well. Will do!
Deletestunning!
ReplyDeleteWelcome and thanks!
Deletewhoa this looks really hard, I can't believe you pulled it off! I know it's like 4 years later, but I just felt the need to comment.
ReplyDeleteI can't believe it's been that long! Thank you, I got really lazy with the shoes after finding many great styles on Aliexpress but I'm expecting a bunch of dolls with unusual feet so I guess I'll have to get into this again.
DeleteI was delighted to find and follow your tutorial,and look forward to fiddling with your ideas. I am just starting on making a Gayle Wray 'Angelina' and have admired her wonderful 3d-printed shoes but they are difficult to emulate, obvious problem,lack of machine! Thanks for your inspiration, and I'll look for your other links.
ReplyDeleteOh, I just googled that! It really sounds intimidating. You can also check out Walkercolours on Youtube, she makes doll shoes mostly from a combination of papier-mache and polymer clay. Good luck with your Angelina doll, seems like a very difficult (but awesome) project :)
DeleteThanks I have an antique doll that needs shoes!
ReplyDeleteWhat a wonderful tutorial on how to make shoes! It definitely is a fiddly job. But rewarding. I will have to try out your directions. Thanks for much for sharing. Yes, Walkercolours also makes some fiddly shoes too that are super great. Thanks to both and all who share.
ReplyDeleteI love Walkercolours' shoes and I got some supplies ideas thanks to her videos! But she uses a lot of polymer clay which I'm awkward with. So I use paper wherever I can. I'm glad you liked mine too!
DeleteLOVE your shie tutorials. I'll be trying these for sure. Thanks so much for sharing your talents, tutorials, and, patterns.
ReplyDelete