
You guys know I'm no stranger to extreme miniature crafts. I came across this dollhouse kit a while ago and I thought it was too cute to pass! I just assembled it recently and thought I'd share the experience. I wasn't into dollhouses... but this is no boring 1:12th scale, it's a tiny winter scene in a snow globe, with furniture and everything. How perfect is that?
I forgot to take pictures of the kit before I started working on it, so here are some seller pictures first to show you what I'm talking about:


 |
| This picture did it for me! |

There's also a different colour version that is inexplicably rarer and more expensive. The interior is identicaly furnished, only the floor, stairs and railing being a different colour.


Both kits are easy to find on Aliexpress, Amazon and other shops. I bought mine from here. The kit comes with almost everything needed to assemble the pictured miniature, including the glass display, colourful instructions (in Chinese), printables, sandpaper, electronics for the lighting and sticker tape. My set even had batteries and glue!
As I said, I was going to take "before" pictures but luckily I discovered the good people from Youtube already took care of everything. Please show some love to Christine, who assembled this exact kit by the book and filmed it from beginning to end! She makes it look so easy!
One thing she got wrong is the scale. It isn't written anywhere on the box, but the house looks smaller than a dollhouse for my 1:6th dolls, so simple math tells me it's at least 1:72.
The instructions are illustrated and pretty straightforward. All the details are labelled, just like in human furniture kits. I didn't have to translate anything or rewatch the video before starting (in retrospect, I should have). The only difficulty is the sheer scale of the project, it's insanely tiny. Whenever I was telling people about this kit, I mentioned that a seed bead represents a flower pot in this house. It's not even a jumbo seed bead, just a regular size 11-12.

This is my finished fireplace with the flower and a lamp. I took some decorating liberties. On the right you can see the beads I was supposed to use - green for the pot and red for the shade. I also used a piece of the provided moss instead of the paper printable for the flower. You can get a glimpse of the instruction here.

Actually, the first item I made was the book.

I lost it about 20 times before I photographed it finished. This is when I began questioning my decision to buy the kit.

Here it is with the door and some house pieces:

I personalized this kit wherever possible. First, I gathered the details I wanted to repaint. Ignore the blue walls, they are for colour match:
 |
| The white triangle had a little chip |
I had to sand the stairs because they had a really wavy surface. I made the top of the steps lighter than the rest to give the stair more volume. The whole endeavour took more time than I thought, but finally I was pleased that everything matched.

Then I changed the curtains. The top ribbon is from the kit, the bottom one is mine.

As I started gluing the walls together, I made an unpleasant discovery. Many pieces required sanding the edge at an angle. That includes a few walls and some of the roof pieces.

See what I mean? But that wasn't nearly enough!
To make matters worse, the walls are made of very thin wood and are very fragile.

 |
| Now this is more like it |
No matter how smooth and even I tried to make it, something just wouldn't fit.


I swallowed my perfectionism and moved on. After completing the main structure, it's time to add the three LED bulbs that light the house from the inside. They wouldn't stick with anything! At this point I got my superglue. Really hate the fumes and white residue, but there was no way I could continue with either PVA, E-6000 or other transparent glues I had on hand. If you have glue type suggestions, I'll gladly take them! Two more dollhouse kits are on the way (they are a lot bigger though, I've learned my lesson).
All the cracks make me want to cry.

More sanding on the outside, and more nasty cracks to touch up:

By the way, I tested all the bulbs before using them to make sure they were working. After assembling the house I connected the battery pack and sound sensor. The lights switch on and off from loud bangs. The wires were already prepared, all I had to do was pull the coating and bundle them together.

While the house was drying, I started making the furniture. They gave me a pink and a green piece of fabric. I liked the pink one more and decided to use as much of it as possible. This is the armchair:

I couldn't trim it neatly because of the size, so I used a tiny file to rub the edges away. The pattern was supposed to be centered :/

This is the whole armchair:

I went ahead and made all the soft furniture with the pink fabric and it was more than enough. The bed didn't strike me as a double size, I made a single pillow for it (plus they are super fussy).

I only used the green fabric for the kitchen carpet. I made the kitchen table with "my" lace as well.

I used some red lining fabric for the chairs:

I was going to repaint all the gold stuff bronze or silver, but after the book gluing torture I decided it was not worth the trouble.
I only changed almost all the provided beads because they were either plastic or ugly. Also got some neater ball chain.

I used their ball chain for the bedroom lights, but I replaced the things that look like shrunken bloody cotton buds with glass drop beads.

I used 2mm crystals for both desk lamps and three 3mm instead of two 4mm bicones for the kitchen.

I used the kit bead for the middle of the chandelier because mine didn't have a large enough hole for five wires. I brightened the rest though with transparent beads. In the picture above you can see I'm supposed to use pieces of the ball chain on the lower swirls. Instead, I gathered clear seed beads on the gold part of a metallic rainbow thread (because I don't have all gold). I used either glue or nail polish under the last bead in each dangle to secure it.

This is the finished chandelier before I cut off the excess thread:

All my lamps. I'm quite pleased with them.

The trees are green paper cones with some dried moss on top. The one that goes inside is decorated with a red topper and a coil of gold wire.

I switched my own, smaller and transparent seed bead and used my rainbow thread as the tinsel.

Finally, I dabbed some glue and sprinkled caviar beads as globes. This is really hard to photograph, my camera decided to focus on the caviar beads. They are smaller than 1 mm. I picked two gold ones for the wardrobe handle and the doorknob.

The last accessory for the interior is a couple of paintings. I cut them out, but it was impossible to make the frame the exact size. I corrected my mistake and after dousing them in shiny top coat (for nails), I cut them out already framed.

I was anxious to see how some of these items would look inside. Half an hour later...

The outside of the house took me a few days. I covered the rest of the trees with several coats of the moss because I couldn't cover bald patches with globes this time. I also noticed a wreath on the door in the product photos that was missing from the instructions. I found a curly bit of moss and glued it closed, then added a few caviar beads.

There's a snow covered tree in the front yard, it looks really yellow. By the way, the fake snow is kind of yellow too, but not to this extent. Here's the tree on white office paper.

I dabbed white and pearl paint and white flocking on it. Then I did the same with the evergreens, because I need consistency. The flocking reminds me of mould, somehow I thought it would look better.

Here are all my finished trees:

There's a snowman at the back of the house. It's made of two ivory pearl beads and some printable accessories.

The red rectangle contains a scarf and hat. Above you can see the paintings, below is the book and the green part has the trees. The black dots I'm pointing at are the snowman's eyes. Excuse me, am I supposed to cut those out? How about...

Interestingly enough, Christine (from the video) actually cut them! I don't have this patience, I just used black paint. Thinking back, caviar beads would have been a better choice because I flocked the yellowish snowman first and the paint bled a little. I used some embroidery floss for the scarf (red), a nose (orange) and arms (brown). The scarf is a whole piece while the nose and arms are separate threads hardened with nail polish.

I also used brown thread to make twigs for the fireplace, which aren't visible and I have no separate photo of them. Oops.
I painted the hat to match the scarf. This is my finished snowman:

I was about to start putting everything in the globe when I remembered some dried plants I hadn't used. Sure enough, when I looked at the product photos I noticed pieces of them glued along the fence. I then found that part in the instructions. Maaaan...

That took forever! They didn't want to stick where I put them, I just kept supergluing my fingers. To think I almost did my nails earlier that day! That would have been a waste.
I cut out the cardboard base and battery compartment and filled the first portion of snow. Afterwards, I cut a piece of paper about the size of the house floor and started dry-fitting, then gluing the yard elements around it.

The white tree was incredibly stubborn for some reason. Even with superglue, I had to get in there and hold it firmly while it stuck. It doesn't help that my hands are extremely shaky. There was visible sweat on the ceiling of the ball when I was done with the tree.

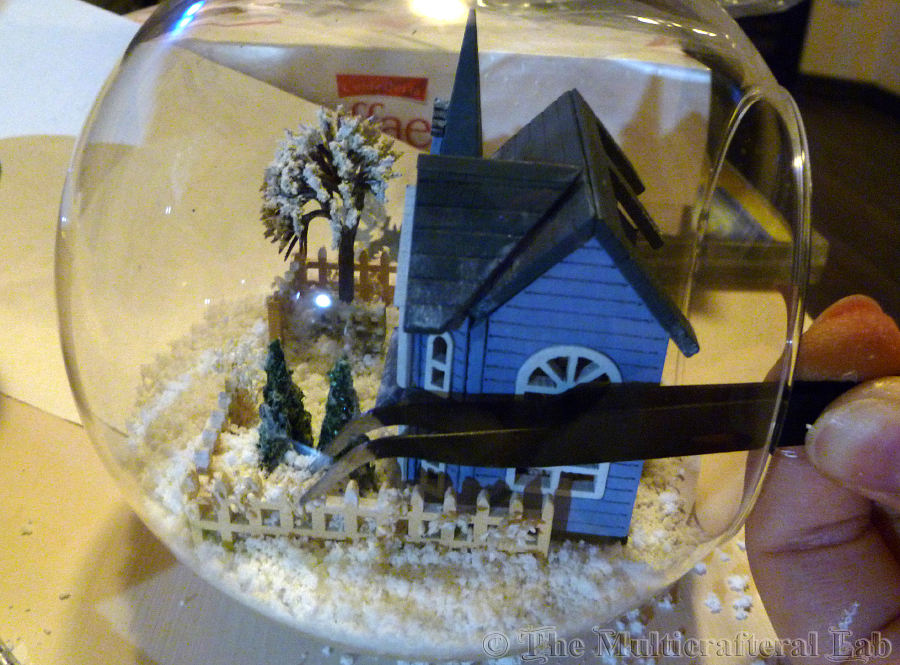
Then I ran into another problem. The house wouldn't go through the hole!

Any way I tried to maneuvre it, a part of it would refuse to go in.

In addition, the wires didn't want to tuck in neatly in the hole.

I had to hold the house with one hand while arranging the wires with tweezers. I also had to push the house all the way into the white tree I took so much effort to glue.

Now, being stupid and not watching Christine's video before putting everything together, I thought I'd put the house and scoop the snow around afterwards. That didn't work.

The snow kept getting anywhere but on the paper. It's a very messy project! I realized there was no way around it other than to take out the house, glue the snow down where I needed it and then go through the same acrobatics with the house all over again. I used a small fan brush to sweep the floor and cut the hole for the wires bigger. Due to all my messing around and the fact that the hole and the lower compartment aren't aligned, a lot of snow got in. I know one day I'll want to take everything out, make a different base and reglue the yard properly.

Even with the house out, it was difficult to reach into all the nooks to brush the glue.

I just piled on dry snow abundantly to cover all the ground.

I had an easier time putting the house back in sideways.

Almost done!

I added more snow in the back and rearranged some of it with bent tweezers, where I could reach it.
And then I noticed this...

In my defence, the globe looks very different in the promo photos. Either the globe is larger, or the hole smaller, and it's definitely higher up from the base. Look:


The white paper stands out like a sore thumb, I'll try to fix it whenever I return to this project. I have enough leftovers for more attempts.

For now, I just display the front part and ignore or edit out the paper from the back view. Are you ready for pretty pictures? I enrolled one of my J-dolls to show the scale. She's not even 12", more like 10 and a half.


The yellow snow reminds me of coconut shavings.

Several views of the outside:


 |
| This is the best picture I have of the wreath |
The inside (with lights on):

Details of the rooms:


I'm sure one of these was supposed to be a view of the whole house, but I guess I cropped them all to separate rooms.
To really appreciate the lights, I moved the house to a darker place. Here are two crisp photos with the good camera:
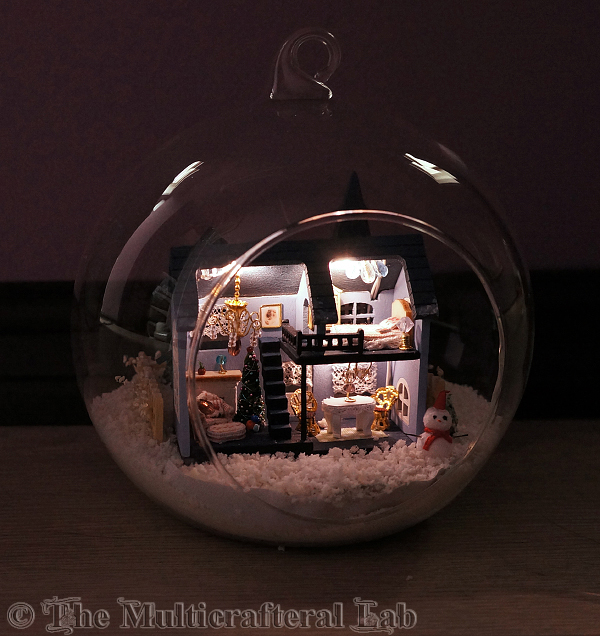

Ultimately, my compact camera is better at catching the overall effect in low light though:


I made a short video to show the on/off mechanism. It was very sensitive in the beginning and it would start whenever I put a tool on the desk, but now that it's drowned in snow, it only works if I slam the globe down.
I really like how this project turned out, it's very small and I like looking at it, turning it around and dangling the chandelier XD I can't say that I enjoyed putting it together, it's too hardcore even for me. The furniture was kind of fun, but the last part was downright annoying. The snow is very messy and unpleasant to the touch, it gets everywhere and it's very difficult to arrange the scene inside a fragile globe through which you can stick two fingers at most. I don't regret this purchase because the result is really cute, but it's definitely not for everyone. I mentioned on Facebook it would make a great gift for people you hate, I was only half joking!
What do you think, would you tackle such a project? Are you into dollhouses at all?
Blackkitty (^^)~

I make dioramas for 1:6 and 1:12 scale dolls. I learn by watching tutorials on YouTube. I also have a 1:12 dollhouse that needs a lot of work. I love them as much as I love dolls. However I’ve never made anything this small. Thanks for this review. You’ve given my all kinds of ideas. It looks beautiful to me. I think I’m going to try one of these kits now.
ReplyDeleteSounds great, I'd love to see what you do! The next two kits I'll make will be a lot larger.
DeleteStill think you should have cut those snowman's eyes out... Just kidding of course ;-D!!!
ReplyDeleteSeriously, congratulations for assembling this very tiny miniature! It turned out great!
I love dollhouses, in all sizes. Such little pieces of art. I wouldn't start on something so tiny myself though, way to difficult for me :-)
Ah, for a moment there I thought you were serious! Thank you for your lovely comment! This dollhouse IS difficult, if I had known how hard it would be I probably wouldn't have bought it.
DeleteIt looks wonderful! I just love the video showing the lights mechanism ❤️❤️❤️ My, you are blessed with patience and resilience.. So many trying moments but you did it! :D I've been wanting to make a doll house for some years now, but I'd never have picked something that small, it would be too intimidating for me.. I'm glad you're braver, now you have this stunning little wonder that you can be proud to have customized and assembled yourself ^^ Also I love the pics with the doll and how her colors match the house ❤️
ReplyDeleteThanks! I do have 14 J-Dolls to pick from :D
DeleteThe scale is crazy tiny, even for me. I'll try the next kits I ordered and tell you my impressions, maybe you can do one of those. I got the one with the kitty and a compact one in a frame.
Sounds great! I'm sure you'll be able to enjoy the process a lot more in a bigger scale. ^^ As for me, I plan to eventually make one from scratch unless I can find what I want as a kit (spooky mansion, kinda ravensblight style), but first I'll need more space, so it's a project that will have to wait a little bit longer
DeleteI am patient... although had I made a video post instead, you would have heard a very extensive collection of curse words in several languages :D
ReplyDeleteYou can totally do that with any kit you like the basic shape of (even this one from the globe).
ReplyDeletehttps://www.youtube.com/watch?v=HXsuuz65Hx0
This is wonderful! :D Thank you lots for the link! ❤️❤️❤️
DeleteI am really impressed with your perseverance and dedication. Definitely a project to be proud of. As for myself, I had the Lundby dollhouse as a girl, but I'm not really into miniatures anymore. The smallest stuff I get is for the 6-8" little girl dolls.
ReplyDeleteThank you! 6-8" sounds like miniature to me.
DeleteHi,
ReplyDeleteThis is amazing and requires a lot of skills and patience. I don't think I could do anything like this! It is worth the efforts and the talent. They look adorable.
I really like your J-doll. I have never seen one before. Are they Japanese style dolls? I will check them later on line.
I have seen your comment on Purple Monkfish Dolly Ramble's blog about the Collector Draculaura (Your comment was in July but I am a bit delayed for everything!! lol). I was checking the reviews because I just bought her and received her today. I bought her second hand, well still in box but he umbrella was unpacked. She has quality control issues on the face paint. It is minor but it bothers me. The heart on her cheek is not perfectly painted (at the top on one side) I am thinking of removing it as she does not have it on the picture in her Diary and I think she looks better without. I did not dare to remove her from the box yet to see if her torso was floppy and her arms stained!!! The worse thing is that she has glue in her head which was a shock for me as I have read one of your comments previously that yours did not. I am quite devastated about it to be honest. One of the reasons I did not take her out yet. I can't stand the bloody glue and it is even worse when the dolls made in china start to leak.
I have noticed that the dolls made in China without glue have also versions of the same dolls with glue. It makes it impossible to buy these dolls without squeezing their heads. I am shocked as I have seen in car boot sales versions of dolls I have without glue with glue heads. Even Venus Music Festival budget doll, Schools out Clawdeen and Dot Dead Gorgeous Spectra. All of them old and made in China. I am glad I have the glue free versions of these at least! Well, this is not the case with Collector Draculaura unfortunately... Bad luck!
So you said you have added some lace on the pink bottom parts of the dress. From what I understood you have removed the hat also and put pins to hold it because she does not have enough hair to use the hair pin (I don't even want to see if mine has enough hair LOL her hard head has put me off!). I don't think I can remove her hat considering the glue inside her head (I could cry, I am so disappointed). Was the diary of yours in English or international?
Well, after all this, I have a request!!! Would you mind to post pictures of your doll? I would love to see the dress with the lace you added. And maybe do a quick review? It would be great!
By the way, I have watched your Youtube videos. You look very nice "Low maintenance Goth"!!! LOL
Anyway have a Great Christmas and I hope to see pictures of draculaura!
All the best
Take care
Londoom
I love your long comments, Londoom! Nice to see you again.
DeleteFirst of all, here's an older pic of my Draculaura with the added lace:
https://scontent.fiev1-1.fna.fbcdn.net/v/t1.0-9/13659005_1199653803418520_6160514378029697170_n.jpg?oh=bf0ed6fad45f8e4483d9c5e769d3a8e7&oe=5ACA24FF
I'm a bit swamped right now and my husband took over my doll shelves, all but a few are in storage for the time...
I guess the glue thing is hit and miss. I don't remember if my doll's head is soft or not, but there's no glue on the hair. However, there was a strand rooted into the forehead. Talk about poor quality control! It was one of the pink ones and it matches the skin, it's not very visible after cutting it. There's minor staining on the arms and the diary is international. We never get normal diaries around here. Did you pay much for yours? I never hoped to find one for an affordable price, so regardless of the defects I'm happy with her. I also found the collector Skelita. She doesn't come close to Draculaura's concept or level of detail, but the price was a real bargain. I guess I could review them together when I take them out of drawers.
The J-Doll you see here is called Saint-Sauveur. They are all sadly discontinued, you can sometimes find them on eBay for crazy prices and there are a couple left on pullipstyle.com, but not this particular one. I got mine in good condition from a Russian doll forum user.
Thanks again for the lovely comment and compliments (^^)~
You are welcome! I'm french, I always say what I mean! (This is why the English think the French are rude!!LOL)
DeleteWell, still haven't take her out of the box but I have looked more closely, her arms are stained (!!). She also have more lashes on one eye than the other and one of her eyes has paint defect too and one is smaller than the other!!!! Oh No no no no no!!!!!LOL I laugh because it is not after all the end of the world!
Well, she was cheap compared to her original price (£30 post included) but it is expensive for me at the moment.
I have Skelita too. I bought her for a ridiculously low price from a shop one year ago. She also has paint defect on the white flowers on her face (I did not notice it in the shop. Shame!) quite thin hair compared to the other ones I have seen and a head full of glue too but she was only £7 so... I like her a lot. She really reminds me of Frida Khalo.
I am not doing very well with the collector's dolls! I am doing much better in car boot sales really. I have found bargains this summer and I really prefer to buy my dolls that way for a lot of reasons, not only the price. I often end up loving the car boot sale dolls more than the others because I had the pleasure to find them unexpectedly, revive them if needed and redress them if they were nude.
As you said, I never thought I would find this Draculaura at all for an affordable price but even so, it is disappointing for a collector doll. I don't have many collectors dolls so I expect more I suppose. At least her outfit is gorgeous. As you said also, with this line being destroyed, it is good to have her. I don't think they will ever produce anything similar.
I know the staining happens on a lot of dolls like Pullip dolls too. These are not the cheapest either. I have bought head Mistress Bloodgood from a car boot sale and her arms are stained too.
It would be great if you would review them together. It is a good idea. I like to watch dolls reviews even if the dolls are not new. I don't mind. Don't panic, I am not in a rush considering how long it took me to buy Draculaura!
I will investigate the J-dolls. I can't afford expensive dolls. I just would like to know more about them.
I hope your dolls will be back on their shelves soon.
Tale care
Londoom
I get what you're saying. We don't have car boot sales, but we used to have a flea market and one of my favourite dolls came from there. Generally, some of my most loved dolls are the ones that needed a lot of TLC in the first place.
DeleteI will see about that MH review, and I want to review some J-Dolls as well. I already have photos for a first part.
Wow! It looks amazing! really hard to make, but amazing.
ReplyDeleteI want to try some of those kits, having seen them on YouTube. But bigger.
Thanks for saring!
Thanks! I want to try some bigger ones too. Which ones do you have your eye on?
Delete