
I like to fiddle with doll accessories. As much as I love to have all my dolls dressed in pretty clothes, I love their accessories more. It's not only that I love accessories in general (meaning for myself); when a doll has all kinds of shoes, jewellery, hair pins, arm warmers, leg warmers - you can tell it's special. It's no longer a toy, it's a carefully constructed art piece.
I feel that if I invest time and effort into the little details, it will count a lot in a finished outfit. And it's something you can’t just half-ass. Let me explain: dresses are everywhere; they are on the doll when you buy it, even if the doll is used you can often find clothes on it – unlike shoes and earrings, which are the first things to break or disappear. You can buy a ton of different dresses from the manufacturer or handmade. You can tuck fabric under a hair band and you got a new skirt. Pin a handkerchief around for when you’re expecting a visit from your sensitive grandma who can't bear doll nudity. Or take five minutes to make one of those sock dresses that are everywhere. The point is, it’s really easy to dress a naked doll. The choice for accessories, on the other hand, is very limited. You have to buy a full fashion pack or hunt down the one item you liked from it on the secondary market. It’s also very expensive. And if you decide to make these things by yourself, there’s no shortcut. There is nothing you can pin and tuck and call it a day. You need a perfect fit.
So yeah, the ideal project for me to obsess over. Last time I made shoes, and yesterday I finally decided to sew stockings - something I've been wanting to try ever since I got my first doll. The story will follow, but first, here is a glorious wall of honeysuckle I passed by today:
I cut the pattern without the seam allowance to see how it would work out. Marker refused to write on net, so I stuck the pattern in a fold and pinned it well before cutting.
I am NOT GOOD at cutting fabric.


Some places were too loose so I adjusted the pattern. You can barely see the new outline on the picture above. I used the corrected pattern to cut another piece. I got to the knee and tried it on. It fit! Time to add the upper trim. I taped the edge on the leg to mark the cutting line and this sparked an idea...

I wanted to see if I can cut through both fabric and tape and then tear off the tape without turning the fabric to shreds (and if not, I still had enough fabric to cut under the edge of the tape). To my relief, it worked! I could go ahead and choose the trim.
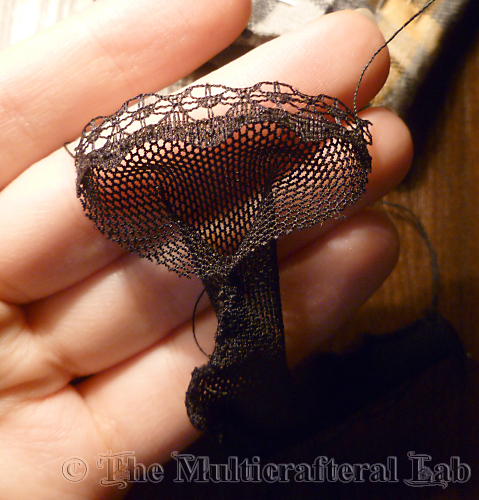
I had two different trims in mind for this. One was an organza ribbon gathered on stretchy thread in the middle, and the other was small lace, non-stretchy. I know many people use stretchy trims, but I don't see how this would help keep a stocking up on smooth hard plastic. The lace looked better anyway:

I sewed the lace to the top of the stocking while the tube was still open.
The finished stocking, after turning inside out:


Success! Still needs a bit more room at the toes and some bulk shaved off the calf, but I did it! I was very excited to start the second one.
Now I used the masking tape trick to cut the whole pattern, not just the top edge. It stuck both fabric layers together, so I could easily lay the pattern on top and make a very neat cut:

The tape peeled off with no problem...

The second stocking took remarkably less time to finish.
So yay! Doll stockings!
Ghoulia wears them like a boss:
I barely got the shoes on, but they were pretty tight to begin with. I will try to make some other pairs to go over socks and stockings.
Here are the stockings by themselves:


 |
| The smell was divine! |
Now, the stockings.
I knew it could be done. You have surely seen them for sale everywhere, with prices ranging from 5$ to 15$. I think this is robbery; especially since none of the pictures I've seen show the back, and that's where the mess is! I wonder what factory-made hosiery looks like. Fortunately, one of the dolls I ordered is wearing tights so I'll uncover the mystery for you when it arrives. I imagine some types are seamless though.
I've considered making seamless stockings, but I don't know what I could use for that. Mesh tubes like the kind where you put beads, or the ones from cyberpunk dreadfalls - even if they are the right size and stretch, I wouldn't know where to find them. So I settled for fitted stockings with an ugly seam in the back. I chose a soft stretchy net. (Is it net or mesh? Or fishnet? In the store where I bought it, it simply goes by "net"). Once I had the right fabric, I needed to work out the pattern.
Now if you ever looked for ways to make stockings, you know there are two methods. One is to measure the leg circumference at different heights and draw the pattern from the measurements. Knowing me, I chose the method that involves the least numbers I can mess up. The general directions go along the lines of this:
- wrap the fabric around the leg
- pin in place
- check that you can slide it over the leg
- sew where the pins are
- cut excess
- turn inside out
- enjoy!
If this looks too easy to be true, it's because it is. I don't know, maybe I don't have the right fabric, or my hands grow from the wrong place, but I just couldn't get the stocking to stay on the leg long enough to pin. It kept slipping, twisting and stretching. I barely got a few pins in there and when I slid it off, it didn't look like a stocking at all. I couldn't even make out the sewing line.
I think this method might work on rubbery legs with internal joints, or with a non-stretchy fabric. But it was definitely unusable in my case.
I decided to make a pattern the usual way - with masking tape. I wrapped the leg, cut in the back, folded in half, traced on paper, added seam allowance... and something didn't look right. I pulled out my fabric (pins still in place) to compare.
 |
| Yup, that is one big pattern |
I cut the pattern without the seam allowance to see how it would work out. Marker refused to write on net, so I stuck the pattern in a fold and pinned it well before cutting.
I am NOT GOOD at cutting fabric.
I sewed about 1,5mm from the edge with a blanket stitch. Mid-stocking, I checked the fit:
Some places were too loose so I adjusted the pattern. You can barely see the new outline on the picture above. I used the corrected pattern to cut another piece. I got to the knee and tried it on. It fit! Time to add the upper trim. I taped the edge on the leg to mark the cutting line and this sparked an idea...
I wanted to see if I can cut through both fabric and tape and then tear off the tape without turning the fabric to shreds (and if not, I still had enough fabric to cut under the edge of the tape). To my relief, it worked! I could go ahead and choose the trim.
I had two different trims in mind for this. One was an organza ribbon gathered on stretchy thread in the middle, and the other was small lace, non-stretchy. I know many people use stretchy trims, but I don't see how this would help keep a stocking up on smooth hard plastic. The lace looked better anyway:
I sewed the lace to the top of the stocking while the tube was still open.
The finished stocking, after turning inside out:
Time to check the fit!
*drumroll*
...
Success! Still needs a bit more room at the toes and some bulk shaved off the calf, but I did it! I was very excited to start the second one.
Now I used the masking tape trick to cut the whole pattern, not just the top edge. It stuck both fabric layers together, so I could easily lay the pattern on top and make a very neat cut:
The tape peeled off with no problem...
 |
| Theeeeere. Much better. |
The second stocking took remarkably less time to finish.
 |
| And turned out a lot neater. |
So yay! Doll stockings!
Ghoulia wears them like a boss:
 |
| With the shoes I made before |
I barely got the shoes on, but they were pretty tight to begin with. I will try to make some other pairs to go over socks and stockings.
Here are the stockings by themselves:
front...
...and the messy part:
They can slip down to the knee when handled, but it can't be helped. I will definitely try to make this fabric into tights. I think it looks wonderful!
Next stop on my list is to figure out a way to make gloves/armwarmers for MH that don't require to pull the hands out... Any ideas?
Love, The Black Kitty (^^)~
Great job, they look wonderful!
ReplyDeleteNice job. I don't think the mess in the back can be helped. But what about sewing elastic to the lace to help it stay up?
ReplyDeleteYes, I was thinking of using elastic lace in the future, but I didn't have anything appropriate at the time. Thanks for the feedback!
Deletehi there, great tutorial. thanks for sharing. did you use a stabilizer to sew the net??/ thanks again.
ReplyDeleteNo, I sewed by hand and gently stretched each portion as I went to avoid bunching. I suppose stabilizer should be used for machine sewing.
DeleteHi!
ReplyDeleteI think this is a great tutorial =) Just wanted to add, I made some stockings the way you first described, like wrapping the fabric around the leg, pinning it and sewing. Pinning the fabric is a bit difficult at first, but it gets better with some exercise =) And I didn't pull it off the leg to sew it, I just sewed it right on the leg. When using elastic fabrig this is no problem at all, all you have to do is watching out to not scratch the leg with your needle =)
That's great! I can't imagine sewing on the doll, although I know many people do it. Another method I read about is tracing a loose outline of the leg on cardboard, wrap the fabric around the cardboard cutout and sew along the edge.
DeleteThis could be my story too... first time (and only up to now... but I had to move my butt in the next days.. I have got some new dollies who are already waiting) seems to me like a nightmare (not really..but I needed more tries than I thought I would). Before I started I thought that it would be done in five minutes but in the end I needed 3 hours and used all of the material (I used a leftover from an old modded stocking from me). But at least my Hujoo Girl got nice Fishnet-stockings :-). The next try will be for my SD-Girl. I already got problems with sewing for her because nothing stays where it should while trying to fit something on her body, so I´ll have to find a solution to get Stay-Ups. I already thought if a little bit of glue or window colour will help (I don´t want to glue it on the doll, I try to find something for a more "rubber-like" inside like human stay-ups have it too)... But anyway, nice tutorial:-) PS: I have sewn the lace on the edge BEFORE I cut and sew the main seam. So I can use my sewing machine... ;-)
ReplyDeleteThank you for the comment, sorry it took so long to reply! A forum I'm reading got revamped and started sending way too many notifications and my inbox is messed up while they sort out the bugs. Anyway, I can relate to everything you said. I had a stubborn idea about making tights the human way, with a single seam in the back instead of three as they usually are. I kept adjusting the pattern as it was always too tight or too loose and every time I was back where I started. Fortunately, stockings are easier to make because there's just one fairly straight seam. I have a better way of making stocking patterns now - I pin some elastic fabric (old t-shirt) on the leg and draw the edges. It's faster, more precise, and doesn't waste good stocking fabric. For the sticky part, maybe you can find a glue that dries tacky and spread it on the top. There is actual rubbery trim in stores but it may be too bulky for most dolls. It's like a flat 1cm elastic with a thin silicone strip on one side. If everything fails, use a bit of double sided tape that you touch with your fingers to tame the stickiness on the doll side. I hope your next time will be easier (^^)~
DeleteThis comment has been removed by a blog administrator.
ReplyDeleteThis was very helpful. Now if only there was one for undergarments.
ReplyDeleteHi Angel! One of the bloggers I follow just posted a very detailed tutorial for satin underwear (non-stretchy): http://monsterhigh-club.ru/penyuar-belyo-i-tufli-dlya-kukol-monster-high.html
DeleteIt's in Russian, but very easy to follow. The squares on the pattern scan measure 5mm. The edges of the pattern pieces are carefully melted with a lighter. The bra closes with velcro and the panties with a snap. I think she did an awesome job there!
First...BRILLIANT TUTORIAL! Thank you SO much! Second, from an OLD lady.. next time try using invisible thread in the dark color and use a ladder stitch. This will make your seam less bulky, very strong and tiny, and is easy(ish) to stitch on the doll. It's a tailoring technique. Usually when sewing something this small, it is easier to allow a bigger allowance and sew BEFORE cutting out the pattern from the fabric...AND if you look on eBay you will find Boob Tubes in elastic lace that already have the edging woven in. It's my own source for fishnet doll size fabric! There is a mesh one that lacks the lace, but comes in lots of colors, and I buy the largest size with the intention of taking it in, leaving the scrap for stockings! Just watch out for a newbie buyer that goes by M***F! This one feels the need to maximum bid EVERYTHING at just over $2.50, and WILL steal what you've bid on! M***F is buying all sizes so I have to believe that this is a re-seller. Again..Cheers for a great tutorial! Pam
ReplyDeleteThank you! I wrote this post before figuring out to cut a larger seam allowance, which is what I do for thicker fabric now. I sew the stockings with a straight stitch, trim down the seam allowance and turn inside out. However, the blanket stitch suits me for fishnet and lace, where I don't like the seam allowance showing through sheer fabric. The seam isn't too bulky, but I'll try the invisible thread next time. I rarely use it because it twists and curls into a wiry mess. I checked out Boob Tubes, it gave me a list of strapless bras. I used to buy cheap lace panties that are made from two trapezoid pieces of wide lace ribbon :) I have enough stocking fabrics and trims that I don't have to worry about scoring more for a while. Thanks for all the tips!
DeleteI suggest this to anyone who sews miniature or beads. There are two threads I use for these in hand sewing, one is called Skala thread which is a bit slippy but incredibly fine and strong. the other, and this is available on tiny reels is no.6 or no.8 fly tying thread. this thread is so fine you can hardly see it even if you used a green thread on black fabric and it's so strong it can cut you if you try to break it. I use the fly tying thread for my beading and the beads never come off now. I thought I'd just pass on my findings.
ReplyDeleteSounds great, perhaps someone else reading this can get their hands on this (^^)~
DeleteHi thanks for the tips, I am doing my first doll. That scary feeling where to start:)
ReplyDeleteOh, good luck! Did you get past it?
Delete