
A very rushed post before I disappear again for two weeks! I wanted to put up Cleo's long hair and so this hairdo was born. I took pictures some time ago and now I'm ready to show you how to recreate it. It's quick, fairly easy, and most important - non permanent!
Without further ado, the big bun tutorial :)
You'll need a doll with waist or mid-back long hair (at least) with a part. All hair should have the same length (except the fringe, if your doll has one). It will not work on visibly layered hair like the example below. Well, you could make it work, but not without a lot of gel and patience.

Have you picked your victim? Here are the other things you'll need:

- clean toothbrush
- couple of pins
- 2-3 small elastics (mine are from doll packaging)
- a toothpick or similar object for sectioning the hair
- small hair clip to keep some hair away while working (it will not remain in the finished bun)
Summer will model for the tutorial steps.
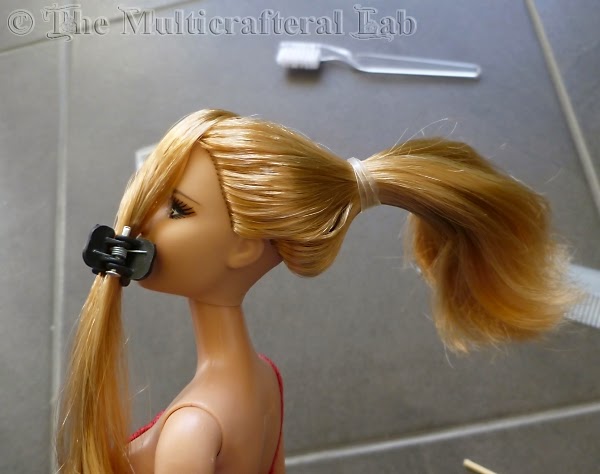
1. With the toothpick/skewer, separate a layer of hair from either side of the part and clip it away. We'll use this hair to cover the mess later.

2. Gather the rest of the hair in a ponytail and secure with an elastic (don't make it too tight). Experiment with the height of the ponytail.
3. The inspiration for this bun is a human hairstyle with a funny name, the upside-down inverted ponytail. To achieve it, begin by making a largish hole vertically under the base of the ponytail:

4. If you are familiar with the inverted ponytail, you'll know you are supposed to flip the ponytail up and pass it through the hole. For the upside-down version, you put it through the underside and it comes out on top. In human scale, this results in a beautiful hair waterfall, but doll hair just sticks out like a broom.

5. Tighten the elastic by pulling the ponytail hair in opposite directions (like for a human ponytail). The hole should close and the hair should be pointing up. You can now twist the elastic one more time, if you want.

6. Tie another elastic close to the hair ends. Summer's hair is a little layered so I tied the second elastic above the layers.

7. Shape the hair between the elastics into a dome by gently stretching it from underneath with your fingers. There should be enough room for the hair ends under it.

8. You can take care of the front hair now. I smoothed each strand with a toothbrush, twisted the end and tucked it under the ponytail base. You can do this step later and choose a different way to secure the "nice" hair from the part.

9. Both sides are done now and I added another elastic to keep all those ends under control:

10. All that's left to do is to fold the ends under the dome and secure it with the pins!

I pushed a sewing pin on either side of the bun from above, grabbing some of the hair underneath:

Push the pin heads further and cover them with hair if you don't want them visible. In the picture above, one of the pins is covered and the other isn't pushed all the way.
That's all!


This bun will look different with another hair length, hair part length, hair thickness and head shape. Here is the Cleo for whom it was intended:

 |
| The pins aren't hidden |


I hope you liked the big bun! As usual, leave your comments and I'll answer them as soon as I'm back :)
I changed the picture size again, this time it's 600px. I'm still trying to find what feels better for the blog.
Anyway! What do you think of the bun? Will it inspire you to create your own hairdo? Do you have a way of dealing with loose, begging-for-trouble doll hair? I'm curious!
The Black Kitty
(^^)~~
Great tutorial! I always struggle with finding a way to keep buns secured on fashion dolls, especially without all of those ragged ends coming out. ;) I'll definitely be trying this on some of my dolls. :)
ReplyDeleteI'm glad you like it, Beastsbelle! Just warn your daughters about the pins in case they want to borrow the styled dolls.
DeleteOr you can sew the buns with contrasting thread which you'll cut when you get tired of it for a play-safe bun :)
Well, isn't this super cool! My poor dolls always get stuck with just a regular old pony tail. I bet they would like this.
ReplyDeleteGlad to hear this, Muff! Mine have the hair down on the shelf or in a ponytail when I need to move them around. I agree, it gets boring :)
DeleteVery nice results! Do you think that a regular "doughnut" would work for making buns with hair of a certain length?
ReplyDeleteI haven't tried a regular ballerina bun, but I don't see why not! You could use a tiny fabric hair tie (for people) as a doughnut. You could use a toothpick to push in all the ends. I'll let you know if I try it, thanks for the idea!
DeleteOh, I missed this one! This is great, I'll have to try it - I never really figured out styling doll hair beyond "boil straight and/or put in a ponytail". This doesn't look too difficult.
ReplyDeleteIt isn't, I promise! I'm glad you liked it. I'll try to think of more hair styles because my dolls have the same problem :)
DeleteOooh, love the style and can't wait to try it! Thanks for sharing!
ReplyDeleteYou are very welcome! I hope to come up with more easy styles :)
DeleteWow, great hairdo! I really like it :)
ReplyDeleteI needed this tutorial, I had tried to do big bun but I could only do one ponytails! Now I am finishing a dress style "gone with the wind" and I needed an elegant hairstyle.
ReplyDeletethank you
agnese
I love "Gone with the wind"! You could pull a little strand before making the bun, braid it and and wrap around the bun. My favourite thing about this hairstyle is that it's entirely reversible :)
DeleteGreat and looks pretty easy I going to try It.
ReplyDeleteThank you, it is indeed easy and forgiving, if you don't like it, you can try again.
Delete👍👍👍
ReplyDelete