Hey guys! It may look like I've abandoned blogging, but actually I've been busier than when I posted every month. Today I have a picture-heavy project that took a year to complete, with long breaks and an apartment change a few months into it. I'm pretty much settled in right now and I hope to appear more alive online, not just posting but also reading and supporting my fellow bloggers. I am not making any promises for the future or excuses for my absence, instead let me show you today a doll that I'm very proud of!
Everything started last summer, when I was walking to my parents' house and spotted an improvised flea market on the side of the street. I happened to have some small bills, and walked out with an old original Teresa with unusual purple eyes:
It's not very often that we see original dolls around here, especially at the flea market. I loved her face, even underneath all the gunk.
She was in very bad condition. Her hair was matted and chopped and her arms were chewed. The body was completely unusable.
Her lip paint was rubbed, but I actually didn't notice until the end of the makeover. I wanted to keep as much of the original face as I could. She still had a pink stud. Someone helped me identify this doll as a Flower Power Teresa.

I obviously realized I'd have to reroot the whole head, and given my previous attempts at this, I knew using actual hair will add a few years to the makeover. I had, at that very moment, a Fashionista "Teresa" (not the Teresa sculpt) with a few plugs of doll hair from a friend in my "to reroot" box. Heads keep going there, and none get out! I actually finished the Fashionista while I was working on Tess, during a few days when they shut off the water and it was the only thing I could do at home for long periods of time without getting messy. Anyway, I digress. I thought Teresa's purple eyes would look great with some bright yarn dreadlocks. I envisioned a cyberpunk look, with a vinyl corset, tutu, pantyhose and lots of metal details. Here's her clean head, by the way:
The trouble was that all the yarn I had at home looked like this:
I also had an equally muted purple and a cream white that I couldn't find. But even with those, the palette was a far cry from the electric periwinkle I had in mind. I knew I only wanted a few colour strands, with the bulk of the hair black, and it made no sense to buy a whole ball of yarn for a piece less than one meter I needed. Besides, it didn't feel right to pay more for the yarn (that I couldn't use elsewhere) than what I'd paid for the doll. I looked for multicolour yarn, sampler sizes, used knitted clothes. I asked everyone I knew to sell me scraps. My sister didn't have anything. My local friends didn't have anything. The people on the Facebook craft supplies exchange groups didn't have anything! My friend in Brazil said she might have some extra yarn, but probably not the colours or thickness I needed. She was preparing a gift exchange with me, so I asked her to include them anyway.
Meanwhile, I still didn't have a body for my ambitious idea. The TNT body would have been great to put a corset on, but the bitten hands couldn't be fixed with boiling water and would have been visible even under tattoos or gloves. The skintone was very particular, quite a bit redder and darker than the typical "Barbie tan" of most bodies I used to buy on aliexpress. I had some pinker bodies, but they looked too light for the head. Then I came across something different around December and decided to buy one and see what it's like. It was tagged "black", looked just a tad darker, but it was impossible to tell for sure without something for comparison. I really liked that it had articulation and an unusually shaped chest and cleavage.
I realized quite late in the makeover that I never took photos of the body. I layered the clothes on as I made them and it was too much of a hassle to take off all the pantyhose for comparison photos. Here are the seller photos:
The body has 11 points of articulation. Everything moves in every direction, except the knees, which are hinged. The hips can bend straight up to a point, and then they splay sideways. The shape is similar to bellybutton Barbie, with a few differences:
- the neck is shorter and the anchor is different (more on that below)
- the chest circumference is similar, but the breasts themselves have a larger area and appear squished, as if by an invisible sports bra. They look great and more realistic under clothes.
- the thighs are significantly heftier, especially in profile
- the foot has a high arch and could be a little bigger. It's more similar to a Model Muse foot.
Buyer photos shed more light. Apparently, the body is used for "Kenya's World" dolls.
 |
Dear ali buyer, if you recognize your photo, I'll be happy to give you credit!
|
Here's the Kenya body next to a typical bellybutton. Not only is the neck barely half as long, the anchor is attached to a bar that goes from front to back, as opposed to the sideways bar of Barbie and most other dolls. That dimple at the top is the anchor attachment point. As a result, the head can tilt from side to side, but not up and down, which makes posing and photographing very difficult. I knew I had to cut the anchor out in order to lengthen the neck, but I wanted to point out this particularity in case you are considering buying this body. I, for one, am never buying it again! It looks great but modding the neck is too much work.
When I told my friend I had over 300 photos for this post and weeded out more than half, she thought I had detailed pictures of every step of the restoration. In reality, I don't have a single photo of the neck repair. In the next neck photo that I have, it's already lengthened, sanded and without the anchor. I guess I was too frustrated throughout the process.
What I did to fix the neck was:
- cut the thick anchor out (I had to saw the neck even shorter and then I couldn't reuse the anchor anyway).
- shape a longer neck from epoxy putty (Milliput white), keeping a rolled paper inside to make it hollow.
- carve and sand away the excess, inside and outside, using electric nail tools. I did my best to copy the bellybutton neck.
- paint the neck (photos later)
- drill holes through the sides and insert a hard wire
- make a new anchor out of a wire tie and the top of the old anchor. I have plans to write a separate post about neck anchors because I made several of them for other bodies, so I won't detail it here.
Anyway, before I even got started on the neck, the package from my friend arrived. The yarn selection was very colourful!
I had told her I already had black, white and natural hair colours, but I'm so glad she included them anyway. I ended up using everything but the brown. Her black was thinner, the white was whiter and the purple was vivid enough. My favourite was the small piece of hot pink, followed by the blue.
On my first reroot with yarn, I separated the strands, fluffed them, made them straight and rooted the single strands. The hair looks fine, but is very light. This time I decided to make tighter, heavier dreadlocks. This yarn was a lot thinner than mine, so I could pull a doubled piece of the separated strands through a hole and secure them inside the head using the loop lock method. Only when I ran out of thin black towards the end did I use my thick black yarn and just barely stuck the ends inside. For the hairline, I filled every third hole or so. In the beginning, I alternated each colourful plug with black, so that I would have black twists in each dread. I rope braided two adjacent plugs (four strands per braid) and secured the ends with glue. I started with fabric glue and switched to white after I ran out. Rooting is my weakness, so I didn't try to make a tutorial for yarn dreads. Believe it or not, this is the best photo of the process:

I wanted to make a fringe out of regular hair for a more authentic cyberpunk style, but I didn't have the hair at home, and by the time I remembered about it, there was no way to squeeze it around the rooted yarn, so I gave up the idea. At this point, I still wasn't sure which body she would have, especially since my friend sent me more heads in need of bodies with the yarn. I kept trying to pair them in different lighting, and thought they matched... sort of. But a minute later I hated it.
I liked the boobs though.
I kept rooting and trying to find bodies for all the heads.
The photo above is the last one from this project in my old apartment. We moved in March, and the first craft things I brought with me were a cross stitch set and my cursed box of reroots. Meanwhile, quarantine started and I decided to push ahead with this particular doll without buying any extra things and make do with just what I had around the house (turned out I had quite a lot of goodies). That included the too-dark bosomy body.
After the whole hairline was finished, it looked too colourful to me, so I added more black. You can see a couple of all black twists here and there:
One happy night in late June I actually finished the head. I counted exactly 60 dreads.
I like it even better from the back where there's more black and different thicknesses. It looks very realistic. The last thing to do was trim them and reapply glue where needed.
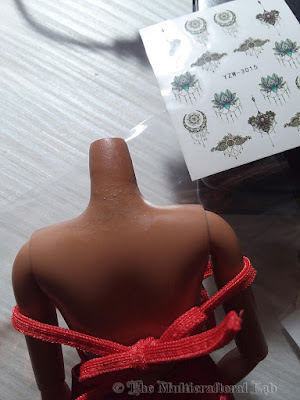
Now the head needed its body. The neck was sculpted and sanded, but not painted yet.

I mixed acrylic paint to try and match the rest of the body, but also make it slightly oranger at the top to match the head. I applied it with a sponge brush and q-tips.
If you guys know of any paint that looks exactly the same wet and dry, please tell me! I have never seen acrylic paint that didn't dry darker. In the photo below, the lighter spot of wet paint at the base of the neck is really the correct shade. Matching colours is tricky.
Feathering the paint into the smooth plastic is very frustrating. Not only that, I also had to match the shine by mixing just the right amounts of matte and glossy varnish. In the end I achieved a satisfactory result. I also drilled the holes for the anchor wire.
My varnish was very watery to allow better blending, so I dried the body upside down to avoid any pooling.
 |
| Luckily, visitors weren't allowed |
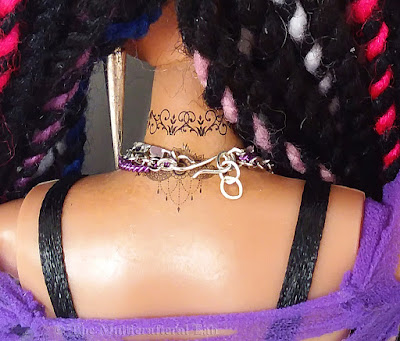
The back of the neck had more bumps and spots, so I added a small water transfer nail tattoo there:
I mentioned adding more orange, and while my gradient was pretty obvious...
...whenever I added the head, it still looked dark and grey:
I started doubting my choice. The head matched the pinkish bellybutton clone much better.
The match was even better in person. The head is just barely darker and more colourful.
But the bellybutton looked so skinny after days of handling the more substantial Kenya body, and I had my heart set on the nice cleavage and muscular thighs. My outfit idea was not going to work with a sculpted grandma bra. I made the anchor, pushed the head down on the bosomy body and decided to cover the neck later somehow.
The head is a little floppy. Normally, I'd readjust the anchor height, but I didn't want to risk damaging the paint. It's not too bad, sometimes the head flops but it can keep a pose if it's pushed a bit.
It was time to start making the clothes. Besides the black corset, I wanted some vivid purple in the outfit. I hoped to find such a colour among my set of pantyhose pieces, or at least hot pink or blue that match the hair. What is a set of pantyhose pieces, you might wonder? It's a mix of cut leg pieces for making flower decorations by stretching them over wire frames. I bought a random set of ten on aliexpress a while ago, hoping to find neon green for another project (I didn't). To my delight, it had two shades of purple:

Neither colour looks true in photos. The blue purple is actually not that blue, and the pink purple is not that pink. The blue purple is exactly the colour I wanted for the hair initially, but since I used several colours in the hair, I decided to continue the theme in the outfit and accessories. I used the blue purple for the top and the pink purple for the bottom. My plan was to layer ripped pantyhose over form-fitting opaque black, because I liked the shape of the legs, but not the design of the knees. For ease of dressing, and to avoid a bright purple seam, I stitched the pantihose to the black fabric first, then sewed the leggings together, sandwiching the purple inside the common seam.
Making a pattern for the leggings was easy. I just wrapped some cotton knit around a leg, cut, tested and adjusted. The pantyhose overlay, though, was an entirely different story. Think you can just trace the pattern, but make it smaller all around? Wrong!
I won't bore you with my failures, what ended up working was draping the same pantihose over a leg, pulling tighter at the wider parts and leaving it almost loose at the most narrow parts. The resulting pattern looks like it's for a whole different body.
Afterwards, I pinned the layers together, stretching to align all the edges. I sewed a running stitch along the edges of the pattern, on the seam allowance.
Because the black piece was pulling and curling, I added another running stitch in the middle of the pattern, lengthwise.
I didn't stitch the middle on my first attempt, and the pantyhose bunched up and caught in the seam. I struggled to turn it inside out and didn't understand what was happening, until I slipped the seam ripper to free the blockage and managed to turn it.
When I said I wanted ripped pantyhose, this is not what I had in mind!
After I thought of the middle seam, everything went smoothly. Well... I mean, for pantyhose. If you ever tried sewing this bitch, you know how annoying it is. It's slippery, shapeless and snags with every needle prick. If I could manage to put the finished garment on the doll, it was going to be good enough. I used panty elastic for the waistband.
Now the fun part: unloading my frustration with embroidery scissors and seam ripper. The thighs had more fabric, so they ripped and stretched beautifully. The calves and ankles aren't stretched much so I had to cut actual round holes.
Here are the finished leggings. I found a looser pair of boots in my shoe box and decided to use them for now.
In between all the legging tests, I made a simple strappy top. Originally, I wanted a mid-bust corset to compliment the squished breasts, but I also wanted to leave the cleavage uncovered. I changed my plan to an underbust paired with a barely decent top and the transparent pantyhose overlay. It was pretty easy to sew, except for the fact that I chose slick swimsuit fabric which kept slipping and distorting the pattern. It turned out exactly the way I wanted and makes the squished breasts look convincingly realistic.
I wanted the pantyhose overlay to have long sleeves and as few visible seams as possible. This is why I wrapped the piece around a cardboard shape to make a smaller tube, aligning the extra fabric with a sleeve cutout in the back. This is what it looked like:
 |
Front
|
 |
| Back |
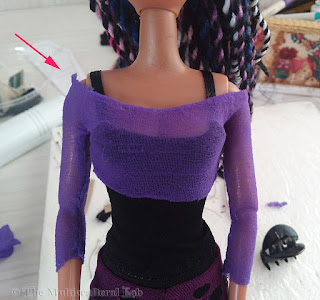
I pinned the front and back layer together at the "V" cutouts and sewed along the edges of the cardboard, then sewed the tube closed at the shoulder. It turned out loose at the top, as you can see in the next blurry photo. I took it off, pinched that seam and sewed it again. I cut off the top corners of the cardboard pattern, in case I ever want to make something similar again.
This is how the loose fit shows on the front:
After I fixed the shoulder gap, it was good enough to style for the final look. I made the sleeves shorter on purpose, so I could stretch them over a finger.
After that I started putting holes in the top. It doesn't look as good as the leggings because the fabric is looser. You'd think that pantyhose has infinite stretch, but several failed attempts taught me to leave more fabric than I think is necessary, because even pantyhose can be too tight. This whole project was a lesson in knowing when to stop.
Here is the outfit so far:
I was planning a bright multicoloured no-sew tutu, but I'm glad I didn't make it before the base clothes, because I didn't want anything covering those shapely thighs with the ripped leggings. So I checked my fabric scraps and found the softest, most delicate pink tulle that matches the light pink dreads. I sewed it in a single layer to lacy black panty elastic.
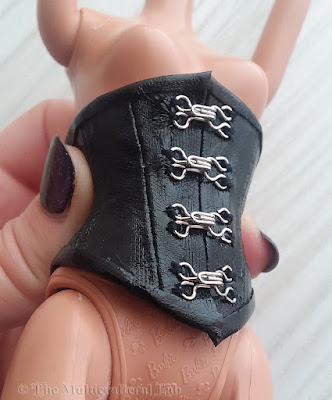
I'm not sure at what point I started making the corset, because my first photo of it shows it sewn, with seams pressed and glued open, edges neatened and trim from the same vinyl glued to the top and bottom. You can see a piece of the trim in the background:

I don't know why it looked so wildly asymmetrical, because it fits perfectly well on the doll. I drafted it on a bellybutton body using the cling wrap+masking tape method, with 8 panels and bit of a gap at the back; then I corrected the pattern to make a more exaggerated waist, tested one half with plain cotton and made adjustments. It's better to make the corset too small rather than too big, to avoid a bulky look. I made the top and bottom intentionally looser because I knew they would fill with the clothes underneath and look curvier overall.
The reason you see two separate halves is that I wanted a working closure in addition to the lacing. A corset in this scale requires a considerable length of laces to allow comfortable (un)dressing, and there is no way to hide the bulk like in a people corset. I wanted to accessorize the outfit with oversized metal hardware and thought silver hooks would double as an excellent functional closure.
I taped the front shut and started playing with the distribution of hooks.
Guys, I know most corsets have the bottom two hooks closer together. I really struggled with that, but the one misaligned hook was just giving me anxiety. I spaced them all evenly.
The tape markers didn't help much, I had to resew pretty much every element, some more than once. I thought adding glue to keep the hook in place while stitching would help, but it just damaged the top finish and didn't hold anything. I thought I'd have to make another corset, but the worst areas are covered by the hooks. The finished result is riddled with pin pricks and not perfectly centered, but again, I took a big breath and told myself to stop before I make it worse. I can see the defects because I know they are there, but they don't detract from the look of the complete doll.
You will also notice that the hooks are facing up. For some reason I thought I could sew them facing down like on every normal garment, but that was physically impossible.
Ignoring the poor choice of background colour, the outfit was coming together nicely, only missing the corset.
I took in the tutu because the waistband was visible underneath the corset. I probably should have made a longer corset with a straight edge for the silhouette I had in mind, but I have no regrets now.
Time to finish the back! I never made a tutorial about eyelets, so I'll use this opportunity to show you how I set them. Sorry my balcony was weirdly foggy that day.
How to set tiny eyelets
I had an eyelet setter tool set that I was dying to try. It consists of a small hole punch and a tool for creating the flange on the wrong side of the eyelet. You also need a hammer and some wooden board you don't mind denting. It is possible to set eyelets, especially small ones, without a special setter. Before these tools, I used a tiny old X-tipped fully metallic screwdriver with sharp edges. The fully metallic part is important, because a plastic handle can be damaged when hit with a hammer. You can use other things to cut the "petals" one by one, like a sharpened flat screwdriver or a small chisel knife. The really tiny eyelets (left, below) don't need a hole punched out, only a push pin prick or a tiny blade slit.
Many people ask me where to get doll eyelets. I buy 1/16" eyelets from
EyeletOutlet (not sponsored, not affiliated). For this project, however, I chose oversized eyelets from Aliexpress (right, below). They are twice as large in diameter, thicker and more difficult to set, which you'll see in a bit. They were pretty cheap and look cool though.
I started by marking the placement and punching holes for the eyelets, since I already had the punch. Without it, I probably could have cut small Xs with an Xacto for a slightly less neat, but similar result.
The hole, or slit, needs to be slightly smaller than the eyelet, otherwise it won't have enough fabric to hold on to and it will fall.
I picked the top of the eyelet with small tweezers and fed the tube through the hole from the face of the corset. I'm only holding it to focus the camera, it sits snugly by itself.
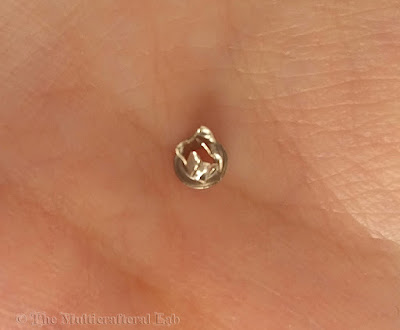
This is what the tip of the setter looks like. The idea is to split the tube into several petals that will open and curl downwards, sandwiching the fabric securely.
I centered the setter into the eyelet tube, held it straight vertical and hammered gently to start cutting the flange. Sometimes they don't split uniformly and the setter has to be rotated. This is actually the best looking flange I managed:
I put the setter away and gave the eyelet a few more light hammers to push all the sharp edges deep into the corset so they won't snag.
One side finished...
The inside looks messy, but all eyelets are secure. You can also see how the seam allowance is glued open.
Here's an eyelet that didn't open correctly, had to be gathered again with pliers and pulled like a stubborn wisdom tooth:
And the completed corset:
*** End of eyelet tutorial ***
To further accessorize the outfit, I knew I wanted flashy satin ribbon and not plain black cord. I checked my ribbon stash.
I chose 3mm double-sided pinkish lavender ribbon from a clothes tag.
The length was just enough to lace the corset like a boot and tie a bow at the end, but as I was threading the holes I couldn't picture the unbalanced look of a bow on either end. It had to be at the waist like a proper corset!

I didn't like any of my longer ribbons, but I found another one from a tag that looked very similar:
Here you can see the colour difference better. At least it's exactly the same type:
I unlaced until I reached the place where I would place the inverted bunny ears, in order to hide the patched spot under the corset.
This following picture of proper lacing warms my heart:
The ribbons have different lengths and the seam can't be moved through the eyelets, which makes both the bow and the bottom knot lopsided. If I could go to the store to get a normal ribbon, I wouldn't have this subtle mix of shades though. This is what it looks like fully laced (I tightened the bottom later):
From the front:
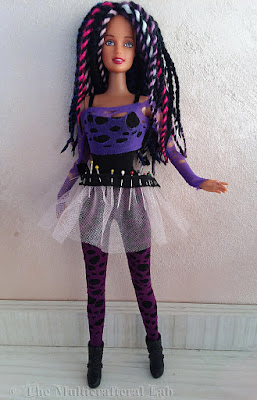
And the complete outfit:

With the hair and outfit done, it was time to add the little details. I started with some nail art tattoos:
In retrospect, I probably should have made a vinyl choker to cover the neck imperfections, but the lace design was too pretty to hide, and I already used all of it.
I wanted these long spike charms as the earrings. They are for human jewellery, but I've seen them on a Barbie Look before and they worked. I also needed a stud base to cover the large hole left from the old plastic earrings (it didn't shrink with heat). It would have been very easy to just pop a tiny eyelet as a tunnel, I just don't like them.
You guys, I was sure I had a tutorial up for earrings, but I remembered I put it elsewhere and I can't find it (it's one big image with text on it). I also found an old folder in my drafts for an updated tutorial in blog format I never finished. Anyway, the earrings are modified human earring posts with a small loop to hang dangles. You'll see them in a bit, but here's what they look like with a rhinestone and a jump ring to connect the spike.
I wanted the earring and necklace rhinestones to match and the only colour I had in the right sizes that matched anything else on the doll was sapphire blue.
The earrings were pretty straightforward and I actually made them last. It took me a while to come up with a necklace design, because I had so many different chains and nail decorations. I wanted something chunky and long to dangle above the waist, something close to the neck to hide some of the imperfect varnish blending, but also to keep the cleavage area uncovered. On top of that, I discovered some tiny purple chain that matched the top perfectly. Those tiny coloured chains are designed for decorating nails and I never managed to put anything through the links, but the colour was perfect and I was determined to try all the options.
Turns out, if I use scraps of wire from my thinnest head pins instead of jewellery wire or jump rings and only push it through an end link, it can pass. I usually make a wire hook and stab it into various links to try out different lengths before cutting off the final piece I need, but in this case I could make an exception and measure the purple chain carefully so I could cut it in order to attach the end. I decided on a three-strand necklace with purple in the middle and pendants on both silver chains.
I used the head pin scraps to make the jump rings and hook, and attached a little piece of 3mm round link chain I like to use as doll sized extender chain.
I wanted a small silver pendant on the short chain and a bulky rhinestone spider pendant that matched the earrings on the long chain. I bent some wire scraps to make the spider limbs and picked two rhinestones for the body. I didn't have any small metal charms so I made one by sandwiching a hook between two star nail studs. I scraped the adhesive and snipped a point off the bottom star to accommodate the wire.
I used a little scrap of leather to glue all the spider parts with clear universal glue (Moment Kristall). I glued the star pendant together with the same glue. I worked in stages because it was slippery.
Before adding the rhinestones, I cut off the extra leather. When the glue was cured, I cut off the excess wire.
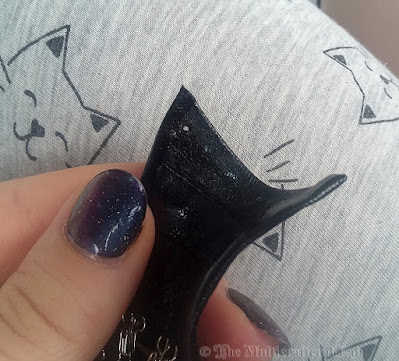
Next time I make a spider pendant, I'll try using one of these necklace end crimps:
They come with a hook and two domes that could serve as the spider's two body segments. I struggled so much to glue a hook that I didn't even take pictures, but you'll see it finished later.
Because the pendants aren't supposed to slide much after installing, I taped the back of the necklace to my mannequin. The new and some old repaired pieces are drying in the background, you can enlarge the picture to see the zigzag earring posts. I do this so they hold better, but if the ear holes are too large I put the tiniest amount of PVA. It's easy to pry off if necessary and doesn't leave marks on the doll.
I made the spider hook from a gunmetal wire. It looks weird now, but it blends into the dark clothes to show off the shape of the spider separate from the chain.
And this is how the closure hook and extender chain work:
My idea with the super long bottom chain did not look good on the doll though. The silver spider and silver hooks made a terrible mess.
I removed some links until the spider hung above the first hook. It snags on the top and obscures some of the cleavage, but overall I think it's an improvement.
Here is the final piece off the doll:
The next step was a very difficult decision. I liked the original face a lot, but it didn't match the new style. At the same time, it was the purple eyes and hot pink lips that inspired the hair, and later, the outfit. This is when I noticed that the perfect lip colour was rubbed and had to be fixed anyway.
If only my Trendy Bendy Teresa was painted like this instead! I vastly prefer the Flower Power face, however I had to say goodbye to it.
 |
| Flower Power vs Trendy Bendy Teresa face |
I wiped off the eyebrows, leaving the rest intact. I painted iridescent magenta all over the lips, trying to cover the rubbed spots. The paint isn't very opaque and it's possible to discern the factory paint layer, but the overall effect is very good. To the eyes I added iridescent cyan eyeshadow and black cat eye eyeliner. I glossed the eyes and lips. The Teresa sculpt has beautiful lips and I like how they look with blue shimmer and high gloss. While the paints and varnish were out, I covered the shiny tattoos to blend into the skin and painted silver details on the boots:

It took me several tried to get the eyebrows right. I wanted them thin, black and very arched, but I wasn't sure of the exact shape and expression (and I often messed up because of my shaky hands). Now this looks more like cyberpunk makeup!
With the lower eyebrows, Teresa's typically high forehead looked even bigger. I really regretted not waiting to bring the hair for the fringe when I was rerooting the hairline. I had the hair at home now, but it was too late for that... or was it? I had an idea how to add more hair without risking damaging the old one.
How to make a fringe hairpiece
The main supplies I used are doll hair and very thin (0.38mm) craft wire that matches the hair colour. I went with all black even though I had some purple too.
The hair doesn't need to be very long, just enough to fold in half and loop around the wire.
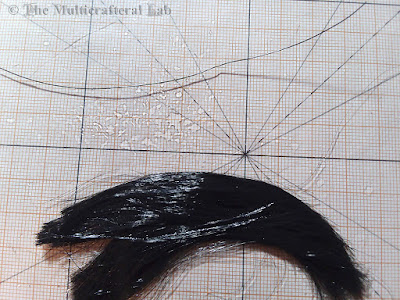
Cut a length of wire that's easy to work with. Separate strands of hair half the thickness of a hair plug. It's easier to do that when the hair is wet.
Loop each strand around the wire as shown. The knots don't want to stay tight, or close to each other, but we'll take care of that later.
This is my first attempt. I couldn't gauge how much I needed while the hair was wet, because I couldn't apply glue and everything was sliding around.
After the hair was dry, I could apply some glue to the wire, leaving a few cm at the start, and slide the first couple of plugs over the glue, pulling tight and holding them close together. I used clear solvent glue (Moment Kristall). When one end is secure, continue in small portions and squish the knots together as much as possible. I had to go back and add about the same amount of hair as the first time, wait to dry and glue.
The fringe is now ready to be styled. Some glue is still visible, but we hope to cover the wire and knots with the rest of the hair.
Meanwhile, I measured where the ends of the fringe will be, found some empty plugs and stuck some push pins to widen them. You may need to stab new holes if the hairline is densely rooted, maybe in a hidden spot behind the first row.
Take a bald doll or a similar round object to shape the fringe on. My model is a Polish souvenir pencil with a wooden woman head I call Pani ("Lady"). I tied the wire around her head like a headband and heated some water to tame the hair. The photo shows how I started, but after I began pouring the water, I realized I'd get a better curl if I flip the hair up. I couldn't take a picture, but I drew the new position to show what I mean. This way, more of the roots are hidden and hot water poured from above makes the hair curl downwards more dramatically.
Set your improvised head upright and pour hot water from the top, allowing gravity to shape the hair. Follow with cold water or a trip to the freezer. After a little while, the fringe is ready to be installed and cut.
Trim the wire so there's only 5mm (1/4") on either end and push gently into the prepared holes. The wire is very thin, so be patient! This is optional, but I added a few dots of white glue to the underside of the knots to glue the fringe to the forehead for more stability.
Don't cut the hair when it's soaking wet, let it dry completely, ideally. Doll hair is lighter than human hair and you may find that it's significantly shorter when dry. Use very sharp scissors, start longer than you need, cut small strands at once. Comb the hair every now and then, find all the strands you missed. Once you achieved the desired length and shape, angle the scissors diagonally and make small snips to decrease the thickness at the ends. Stop when it looks good to you, if you try to make it perfect, it's easy to overdo it.
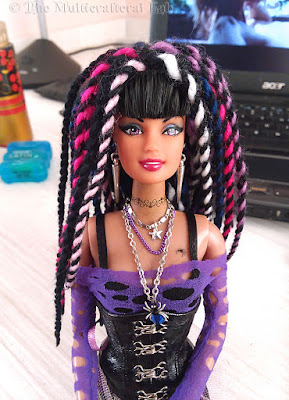
This is when I took a good look and declared the project complete:
*** End of hairpiece tutorial ***
I'm happy with how Tess turned out. Maybe one day I'll decide how to paint her nails or I'll make her shiny platform boots. Maybe I'll think of an accessory that's missing. She looks quite musical to me and I wanted to give her an instrument. I love cellos and her sitting pose is perfect for one:
I borrowed one from my J-dolls, but it's way too small. I have a violin that's in scale, but she can't hold it at all.
My friend found some plastic Barbie instruments that will come my way when the mail exchange opens. I think it will be fun to decorate these with nail art, similar to the Hard Rock Cafe Barbie instruments.
So many things can be improved upon, but I'm stopping here for now. Looking at this girl makes me happy.
Sorry about the cat hair, the lint roller is powerless against my pantyhose-loving kitten.
Here she is showing all sides of her complete hair and outfit, and some accessories details.
I love this perfect corset profile:
I took this picture to show the earrings, but you can also see how realistic the hair looks and how easy it is to arrange:
Let's look back to her first photo and appreciate how much she changed. All that's left from the flea market purchase is the bald head with an eye colour that inspired me. Everything else was chosen and built around that. I'll say, for a dirty bald head to pull at my heartstrings so much, it's quite an accomplishment and an adventure that was worth every penny.
I don't have a good setting for doll photos in the new apartment and my good camera is broken, but I hope I could do Tess justice with my phone.
 |
And a mandatory toxic cyberpunk colour edit
|
I wanted to show you how different the legs are from Barbie. I found a bellybutton with tights for a fair comparison:
I love the shapely legs even though the articulation is inferior. The cello pose is an extreme example of this, because it's possible to find a nice sitting pose.
Since I mentioned the Trendy Bendy doll earlier, here are the two Teresas together:
They seem to share a passion for crazy hair and flashy outfits.
Tess is not my first project doll. Shortly after I bought her, I found a wingless fairy in similar condition, but her body had less serious bite marks, which was fortunate because her skintone is impossible to match.
I restored her before the New Year and added the last touches from a bag of stickers that arrived before the lockdown, but I never had a chance to do a final photoshoot with the nice purple wall from my old apartment that goes with everything.
She was supposed to be my first rescue project. I named her Serena.
I'll try to make Serena's photoshoot happen because she was such a fun project. Meanwhile, here are some more photos of Tess, who's ridiculously photogenic.
I have yet another doll I completed before Tess. She started as a generic blonde GG head with nice makeup that my friend sent me. Her makeover is not this drastic, but it felt a bit like a rescue (from anonymity). I usually do bits and pieces to fix or improve some dolls, but spending weeks and months redesigning a single doll from head to toe is a whole different experience. This blog post alone took days to write (thank you Blogger for auto-saving every single second and making this the slowest, most frustrating writing experience). I love reading doll makeover stories and I hope to write my own little series. Let me know in the comments if you liked the first installment!
Blackkitty (^^)~




















Very impressive makeover. I'm also impressed by your ability to improvise and correct things on the fly.
ReplyDeleteSigned, Treesa
Thank you, Treesa! It rarely happens for plans and resources to work perfectly, so we have to make the best of what we get. And I don't just mean craft projects.
DeleteIt's so good to see you back! It's amazing how much work you put in on this doll, but she turned out fantastic, so definitely worth it. I've been working on streamlining my own craft room, so I hope at some point I can put in this much work on a doll.
ReplyDeleteThank you, Barb! I'll check out what I missed on your blog. An organized craft room is a big asset. Another thing that made it easy to try so many things was that there was no way to make it worse... the doll was a wreck to begin with, and so was Serena, the pale fairy. I actually passed her by twice and bought her just so I wouldn't walk out of the flea market empty-handed. So get a doll in terrible condition and start experimenting :)
DeleteThis was a joy to read, thanks so much for sharing! ^__^ What a wonderful feeling to save a doll from ruin and give her life again. But you did so much more than that, she isn't just saved, she's absolutely wonderful now! And I'm also happy that you shared so many great tips, that way we can learn and play too. Ah, as I was getting near the end I kept thinking about the GG gal you saved (you really did!), because she too has the musician vibe and looks incredible after your magic touch ^^ (And they look so good together!)
ReplyDeleteLast but not least, YAY for a new blog post! Hope to see more of your projects in the future ^^
Thank YOU for your support, advice and supplies! I would still be looking for yarn now without your input XD
DeleteSo you remembered about the GG gal, too? I haven't even looked at them together yet. To think that they almost ended up with the same body, though! I have this little shelf now where I rotate dolls now and then until I get my big bookcase display. I'll check if I can make some room for her. I hope her hair hasn't stained my drawer...
You are very welcome! I'm glad I could help in the fun, even if just a bit ^^ But I can't believe you didn't look at them together yet O__O When I read about the GG here, I was expecting to see a pic of her with Tess and Serena. I think I see a girl band taking shape there, they totally have the rockstars looks :D (and crossing fingers here for your drawer xD)
DeleteAh, you did not expect me to reveal ALL the makeovers in one post! I went to the storage drawers to retrieve Trendy Bendy because they had similar faces. GG was in a different drawer and I didn't think of her at first. She wasn't a flea market orphan like Serena, after all she was lovingly picked by you for me.
DeleteFor anyone reading, the drawer is ok. The doll had some experimental hair dye treatments that I'll describe in her own post :D
Ohhh, so there will be more makeover posts and GG will even have her own?! *___* That's awesome news! I'd love to see that one especially, you know I didn't even recognized her as the same girl when you showed me the after ^^
DeleteI don't know when, but I plan more makeover posts for sure. Ideally, I would write one for every doll I changed in a significant way, even the MM Basics I redressed in the grey outfit with the straw hat. I am not making any promises, but GG is next in line after Serena.
DeleteOh my! I loved this post! Tess turned out wonderfully! Thanks for sharing all of the details. The corset is to die for. I need to make corsets for a project for 10 dolls (don't ask, lol!). I will probably streamline it a bit, but I got some really great tips from your post for making them. I love Tess's outfit, the jewelry, everything. So nice seeing you back to blogging and I am totally looking forward to your next doll makeover!
ReplyDeleteThank you! I can include the corset pattern if you want. Still, I have to ask: 10 corsets? I hope you are going to write about this project. I am very intrigued.
DeleteWelcome back! It's taken me forever to keep up with my reading list and to finally have some time to read the whole post.
ReplyDeleteI think you did an excelent job with Tess. You had such a clear concept and managed to execute. I can't see things that clearly in my head. That Teresa sculpt is one of my favourites, maybe because of nostalgia.
I'm glad that you found a matching body, it's great to be able to find some alternatives out there, specially since Mattel decided to make the MTM bodies scarce and hard to find. The one you chose looks quite similar, and I wouldn't be able to tell it's not a Barbie body if you didn't post a comparison.
Congratulations on your move, despite not having any spots for photos. Maybe you could paint a piece of foam board or binding cardboard in a similar color, if you can't paint your new home. I also know you got your diploma, so also congratulations on that.
I would love to see more transformation posts, even though I know those are the ones that take the longest to make.
Take care.
Thank you! I know how busy you are studying and I appreciate your taking the time to comment all the more. I'm pleasantly surprised by your praise to my imagination. I started with only two very general concepts: cyberpunk and purple. I made it up as I went based on the materials I had available, one piece at a time. I try not to imagine something very specific (but it happens anyway) because then I get frustrated that the vision and reality don't match. For example, the hair colour. I looked for the right yarn for months, and ended up adapting what my friend sent me. It is best to have a very general idea (for example: redhead in a medieval dress in blue tones), that to be obsessed with recreating a specific embroidery pattern or to be stuck at choosing fabric that has a good colour or texture, but never both. And to start building something and add to the general idea little by little. I could not picture the necklace at first, but it came to me after looking at the finished outfit for several days. It is not a gift or a talent, rather it's noticing what goes well together and assembling it.
DeleteI do enjoy the transformations and you can expect more posts like this, because there's really nothing else to write about. Oh! I also finished my pumpkins, I should post a pic before autumn is over. I couldn't buy anything interesting in a year, with one exception. So I'm "stuck" fixing some neglected dolls. Today I finished a simple outfit for a Tonner that started on the wrong foot since her arrival from the store a few years ago. I actually have enough material for several years of quarantine. Next stop is the tattooed fairy Serena, who is only missing nice show-off pictures. My walls are fine for a background, but I'm missing good lighting. I used to rely on the sun so I don't have any light equipment. But I definitely plan to write more, even though complete makeovers are more difficult both to create and to write, they are also more rewarding.
Thank you! I'm quite pleased with how she turned out too. Very few dolls grab my attention from start to finish, most of my makeover projects are stuck in the beginning phase. My friends and I are working on a system to get all those projects going. Now, editing blog entries for each is an entirely different story 😅
ReplyDeleteLong-time lurker surfacing ^^ I've got my sight on you over at Emily's ToyBoxPhilosopher blog back in those days, but you weren't really actively posting anymore by the time I visited your blog for the first time. I've been checking in time and time again, but it's been such a long time since your last post that I recently forgot to come around - I'm glad I peeped in to look up the doll wreath tutorial, because it has been *such* a joy to see a new post up! Welcome back!
ReplyDeleteI really enjoyed reading and seeing the detailed makeover, and Tess turned out great! She looks badass, and I really love her outfit (especially that *perfect* corset!) and dreads. And you even helped me with yet another tutorial - I've recently received an eyelet tool similar to yours, but no instructions were accompanying it, and I haven't yet gotten around to check online - now I no longer have to! ^^
Back to Tess, seeing her turn from that sad (and sadly also common) sight into a diva was especially delightful to me because I often wonder what happens to dolls in similar conditions when I come across them at flea markets. Will they eventually end up being thrown away, or will someone notice them and give them the time and effort, will someone love them again? It was so good to see some of them do end up like this! If I had enough money (as I imagine such a project wouldn't necessarily finance me) I'd love to pick up, restore and rehome sad dolls like this girl - they should deserve a second chance, but there aren't that many people who feel skilled or comfortable enough with makeovers of this volume.
Looking forward to your future makeover posts! :)
Thank you for your lovely comment! I don't know why I'm not seeing comment notifications and I missed yours. I'm really glad this makeover doubled as an eyelet tutorial and I hope it was useful for you. I have been to the flea market a couple of times since, but I've come empty. I did buy some dolls on a second hand website, they just need some TLC. I love challenging rescue projects myself so I'm keeping my eyes open for interesting projects. Regarding the fate of flea market dolls, I have a friend who fixes and donates many broken play dolls in her home country. My projects are more ambitious and the dolls aren't playable by the time they are finished. But they are doing well at my place :)
DeleteNo worries about replying late (and see? I too haven't seen yours in time either :/ ), and thank you for responding! :) Hearing about your friend fixing up and then donating previously well-loved dolls has made my day - it's so good to know there are people like this, and that those dolls are getting another chance to make someone happy (and the same goes for your dolls: if you are buying them for yourself, it shouldn't matter if they turn out not playable after their makeover if at the same time they succeed in making you happy). In today's world too many stuff is getting thrown out nowadays that could still be repaired and enjoyed.
DeleteI agree, consumerism and instant gratification culture are rampant these days! I try every reasonable, and sometimes unreasonable solutions before throwing something out, especially dolls. My friend is even better at that than me, and more prolific.
DeleteI love your Tess, you've done such a great job of bringing her to a new life. She reminds me of Medusa. :)
ReplyDeleteThank you, I actually have a new yarn reroot project that looks even snakier:) I should really post some updates somewhere. Sorry Google is eating my notifications.
DeleteThank you! Accessories and details really make a difference.
ReplyDelete