
My quest for doll shoes began eight years ago, when mom bought my first Barbie. It was from a beach series and didn't have shoes, so I wanted very much to make them myself. These were my attempts:
- court shoes from paper, with nail polish and silver thread (disintegrated)
- velvet boots with no heel and no shape, assembled in 5 minutes (terrible)
- boot from a fake leather belt, almost finished but couldn't get the second to match and I didn't like it anyway (in the garbage)
- proper boot, first successful footwear, but I have yet to make the other one...
I will dedicate a detailed post to these, especially that last boot. Now let's see how my MH shoes came to life.
MH was a good choice for two reasons. One, the feet are quite big and easy to work with, and two, I find them really ugly. I mean, what is with the splayed toes? My Draculaura had beach sandals. I have a thing against footwear with open toes. Especially on feet like that. Grrr. Needed new shoes asap. I opted for these rounded ones with an ankle strap, which I decided would be simple enough to make and worked with the Lolita vibe I'm getting from this doll.
I was familiar with this wonderful blog about shoes and I was very eager to apply some of the things I learned from there. Tarja’s method of making shoes was very different from anything I had tried before. All the things I was doing wrong were causing a lot of frustration. I used to cut all the details and try to piece them together on the foot, shaping the sole and everything at the same time. Tarja makes stiff insoles and outsoles beforehand, which seems like common sense, right? When you start gluing tiny stubborn details to each other, you run out of hands and having the soles nice and ready really helps!
Seriously, if you want to make doll shoes and don’t know how, just go to her blog already. I’ll forgive you if you forget to return. Here is the link again. You’re welcome.
Edit 22/01/2014: I can't believe I found the very first pair of shoes I made for Barbie! The heel was cut from a matchstick and due to the bumpy surface of the sole (I didn't realise it could be sanded) I couldn't get it to stick securely. Instead of widening the contact point somehow, I kept piling more glue. It fell off. See for yourselves and learn from my mistakes:


Now, back to my shoes. I didn’t copy Tarja’s
method. There are many things I made up as I went, and I didn’t take pictures
of the process. In fact, I was surprised to see it worked. I’ll describe what I
did in a few words, and a proper tutorial will follow in a different post. I do
have a pattern and intructions for the strap closure, which can be adapted for chokers and clothes as well.
First, I drew the sole pattern by sticking masking tape to the foot and outlining right there on the sticky side. I made the insole with cardboard and paper glued to each other with PVA. Before the glue set, I bent it to the curve of the foot.
My sole was longer at the toes to allow for a rounded tip. When the insole dried, I attached it to the foot with more masking tape on which I drew the upper part. Now my pattern was complete:
 |
| This image is exactly 10cm at 300dpi. I drew an inch too. I hope this helps because I have no idea how printers work. |
The triangles mark the parts that are glued under the sole. I cut these details from thin leather, like for gloves. It was really stretchy and messed with my pattern; I had to cut a piece twice. I glued these with PVA as well, as advised by Tarja. Ideally, the sole should be secured to the foot during this step, but I honestly can't remember if I did so. The centre is glued first, then the next triangles on each side. I filled the gaps on the sole with leather scraps to make it level. Then I used bits of cotton wool soaked in PVA to stuff the toes.
I made outsoles a little bigger than the insoles, but when I tried one on a shoe, I hated it. The edge stuck out way too much, Doc Martens style. After some trimming, I ditched them altogether and decided to use the insole pattern for the outsole as well, and it looked fine. Next time I'll just make it a bit longer. I glued paper to the cardboard sole and shaped it on the foot.
As I was assembling the shoe, I had a lightbulb moment. The paper layer was on the underside of the sole; I bent the hanging edges up towards the shoe, and the resulting paper "cup" wrapped all the messy cardboard! I glued the edges and let it dry.
To make the heel, I used a piece of a bamboo skewer. I wanted the upper part of the heel to be fatter. I tried to fill it with wood putty, then cotton wool with glue. Neither worked. In the end, I did it with just 4 strips of paper and glue... I will explain how to do this in another post with pictures, I promise! (update: here it is: sole tutorial)
When everything was dry, I adjusted the heel and sanded the bumps with a nail file. I smoothed with glue, then painted everything with two coats of acrylic paint. If I had matte varnish, I would have used that too.
The hook closure
For the strap, I wanted an elastic with seed beads on it. I tried and it didn't look good. I had to make a strap that closed. I set for a hook-and-loop. The hook is a bent piece of thin wire. Mine are leftovers from head pins. Like this:

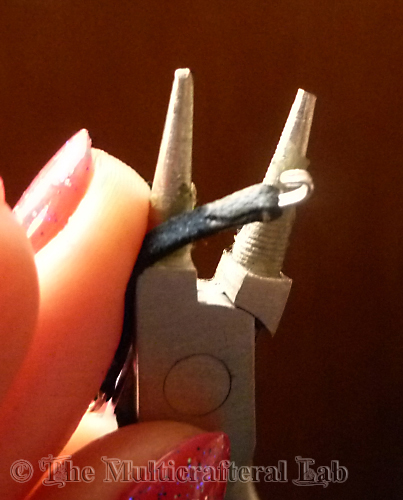
I bent it really well with pliers:

The straps are leather strips with tapered ends. Getting them even was a major pain.

Next time I'll make them wider because one of them ripped when I inserted the hook. The hook goes into a hole near the end:
 |
| Do not use your thumb like this :) |
I pushed the hook so the ends came out on the wrong side and bent them in a "T" shape:
 |
| Ignore my nails. Different day. |
I snipped the excess wire and glued the end of the strap over. I used a rubbery glue that dries flexible. I bent the wire towards the wrong side to create the hook:
I measured the strap on the doll and marked the place for the loop. My loops are simply 3mm jump rings through which I threaded and glued to the strap. I forgot to take a picture, but here is what they look like on the finished shoes:

The thin part of the heel piece is folded to the inside and glued over the ankle strap. For some reason, it took me at least ten tries to get the correct placement. I even managed to glue a strap upside down twice. The picture shows the shoes after I painted and varnished a part of the insole that is visible while on the doll. I was so excited to have finished that I smudged some varnish and had to reapply it -_-
Aaaanyway, time for showoff!
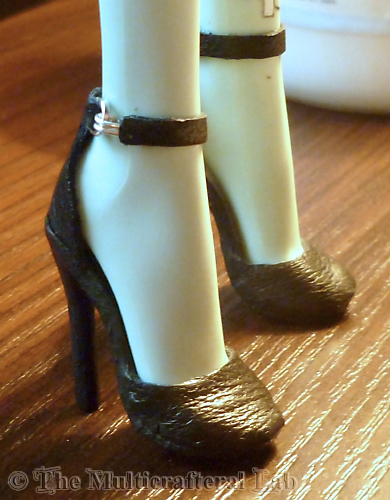


As you see, the shoes fit well and the doll can stand unaided in them. The thin leather stretches like crazy and is already pretty loose after all the handling, especially the heel. I will have to look into ways to stop it from stretching (fusible interface maybe?). Regardless, I'm happy with how these turned out.
So what do you think? Are you interested to find out how I made the heels? Do you have suggestions for improvement? I'd love to hear back from you.
Love, The BlackKitty (^^)~
i remember looking at the hooks and wondered "are there hooks so thin in sale already? so nice!". Now I know it's handmade (isn't everything?) :)
ReplyDeleteYes, unfortunately most doll things must be made from scratch. Wait until you see my necklace clasps!
DeleteYes, how _did_ you make the heels? :-)
ReplyDeleteSO guilty of postponing this project. The plan was to finish Barbie's second boot and write two more posts about the shoe process. The heel is a diagonally cut stick with two strips of paper glued around the base at an angle, one in front and one behind the heel.
ReplyDeleteI promise to link you to the heel post as soon as I have it up. I hope you are watching follow-up comments...?
love the post, thanks so much for sharing..I now have the perfect solution to doll shoe hooks thanks to you!
ReplyDeleteI'm glad you found it useful! Here is another version of doll hooks, not my invention or photo:
Deletehttp://www.kimberly-club.ru/forum/index.php?PAGE_NAME=message&FID=18&TID=429&MID=10761#message10761
Tiny hooks are easier to make than you'd think, give it a try!
Brilliant! Thanks for this.
ReplyDeleteThank you, Diane! You're welcome :)
DeleteSoooooo helpful! do you have more shoes or even clothes I can know about, espesily operetta, my Operetta doesn't look to good... or Frainkie.
ReplyDeletebeautiful shoes, I have the same! I'm "studying" for all accessories to dress "gone with the wind," I'll try to make these shoes, but do not know if I can, I see them hard! you are right, find the right accessories is almost impossible, I would need a corset, and I can not find anything!
ReplyDeleteWhat dolls are you making the costumes for? Perhaps you could modify some stock accessories to fit your theme. Another tip: glue bows to hide your mistakes XD To mimic a corset, take (or sew) a fitted bodice, draw or sew vertical stitches where the panels would be, add trims and bows to everything... You have a very interesting project ahead, I wish you good luck and I'd love to see progress and finished photots!
DeleteAmazing!
ReplyDeleteSo beautiful
ReplyDeleteVery cute - inspiring! I have experimented with using Tool Magic, a
ReplyDeleteliquid plastic. I'll have to make a tutorial. It worked quite well for a first experiment.
Sounds great! Is there any place I can see it?
DeleteLove your shoes.
ReplyDeletePor favor cómo se hacen las planillas de los zapatos, de qué material. Gracias
ReplyDeleteThe soles are layers of cardboard boxes glued together with white glue.
DeleteAmazing work. Thank you for sharing, maybe one day I’ll have the courage to try and make some shoes.
ReplyDeleteThank you! I don't think you have anything to lose if you try.
DeleteI was soaked in making doll shoes too wah back 2020. Reading your blog now abt it makes me miss it. I have various materials in making doll shoes. The ines made of clay and fabrics were ok but eventually ripped off. I like your dedication. When I was failing I moved to plastic canvas bag making. But I missed making this tiny shoes now. I like reading ypur blog. I was smiling reading it.
ReplyDelete